 Subscribe
Dec 15, 2016
I heard about gRPC some months ago and decided to learn a bit about it. Here is a collection of the information I found about it as well as a simple gRPC demo that uses Go and C#.
I created a github repo grpc.demo with all the code in this article.
Table of contents
- gRPC
- Protocol Buffers
- A gRPC example
- Installation-process
- The proto file
- gRPC Go Server
- gRPC Go Client
- gRPC C# Client
- gRPC dotnet core Client
- What else
- Resources
gRPC
gRPC is an open source RPC library from google. It is an alternative to REST for microservices. It is based on the HTTP2 standard, and uses protocol buffers (Proto3).
gRPC is available in many languages, some of them have there own implementation (C, Go, Java) and some a wrapper around the C implementation so you are not tied to any language.
gRPC extends the Go programming model over the network.It is an excellent fit for building parallel, distributed, and streaming systems.Sameer Ajmani
gRPC aims to be more efficient than JSON/HTTP. It encodes data with more efficiency thanks to Protocol Buffers and HTTP/2 makes the transport faster.
You can use Unary RPC (request, response) or Streaming RPC (send one or more messages).
To learn more about the motivations behind it you should read this web page: gRPC Motivation and Design Principles
Protocol Buffers:
Protocol buffers are used to define a mechanism to serialize structured data. You define the structure of the data (messages) and a service that you want to use to communicate. Then generate the source code for the message(s) and service(s) you defined to use in the server or client.
Multiple applications written in different programming languages can exchange a large number of messages quickly and reliably without overloading the network. Practical guide to protocol buffers
A gRPC example
I wanted to build a simple example to test the Unary RPC use case. Test how the exchange between different programming languages worked/felt.
I decided to create a Go server and a Go client to start. Then extend it to a C# client that calls the same Go server as before. And finally try a dotnet core client as well.
Installation process
To use gRPC you will have to install grpc, protobuf and protoc-gen-go.
- install grpc
go get google.golang.org/grpc
- install protocol buffers
- install the go compiler plugin protoc-gen-go
go get -u github.com/golang/protobuf/protoc-gen-goprotoc-gen-gois a compiler to generate Go code from a proto file.
The proto file
The proto file is where you define the gRPC service and the messages that will be used to communicate.
syntax = "proto3";

package reverse;

service ReverseService {
    rpc ReverseString (ReverseRequest) returns (ReverseReply) {}
}

message ReverseRequest {
    string data = 1;
}

message ReverseReply {
    string reversed = 2;
}
To generate the gRPC code run the following command.
> ...\grpc.demo> protoc -I .\proto\ .\proto\reverse.proto --go_out=plugins=grpc:proto
This generates a reverse.pb.go file that holds the ReverseRequest and ReverseReply messages types as well as the ReverseService client and server.
gRPC Go server
Create a server type that implements the ReverseString function and make the server serve the gRPC service:
package main

import (
	"log"
	"net"

	pb "github.com/santiaago/grpc.demo/proto"

	"golang.org/x/net/context"
	"google.golang.org/grpc"

	"google.golang.org/grpc/reflection"
)

const (
	port = ":50051"
)

type server struct{}

func (s *server) ReverseString(ctx context.Context, in *pb.ReverseRequest) (*pb.ReverseReply, error) {
	// your reverse string implementation here
	return &pb.ReverseReply{Reversed: reversed}, nil
}

func main() {
	lis, err := net.Listen("tcp", port)
	if err != nil {
		log.Fatalf("failed to listen: %v", err)
	}
	s := grpc.NewServer()
	pb.RegisterReverseServiceServer(s, &server{})
	reflection.Register(s)
	if err := s.Serve(lis); err != nil {
		log.Fatalf("failed to server: %v", err)
	}
}
gRPC Go client
Create a Go client that dials the gRPC server. Get the client object and call ReverseString on it.
package main

import (
	"log"

	pb "github.com/santiaago/grpc.demo/proto"

	"golang.org/x/net/context"
	"google.golang.org/grpc"
)

const (
	address = "localhost:50051"
)

func main() {
	conn, err := grpc.Dial(address, grpc.WithInsecure())
	if err != nil {
		log.Fatalf("did not connect: %v", err)
	}

	defer conn.Close()
	c := pb.NewReverseServiceClient(conn)
	r, err := c.ReverseString(context.Background(), &pb.ReverseRequest{
		Data: "Hello, world",
	})

	if err != nil {
		log.Fatalf("could not greet: %v", err)
	}
	log.Println("Reversed string: ", r.Reversed)
}
Output:
server:
...\go.server> go run .\main.go
2016/12/13 14:28:10 transport: http2Server.HandleStreams failed to read frame: read tcp [::1]:50051->[::1]:1195: wsarecv: An existing connection was forcibly closed by the remote host.
client:
...\go.client> go run .\main.go
2016/12/13 14:29:20 Reversed string:  dlrow ,olleH
gRPC csharp client
On a c# project install Grpc.Core, Grpc.Tools and Google.Protobuf from NuGet.
Then generate the c# classes using protoc.exe and grpc_csharp_plugin.exe
...\csharp.client> .\packages\Grpc.Tools.1.0.1\tools\windows_x86\protoc.exe -I..\proto --csharp_out . --grpc_out . ..\proto\reverse.proto --plugin=protoc-gen-grpc=packages/Grpc.Tools.1.0.1/tools/windows_x86/grpc_csharp_plugin.exe
This generates Reverse.cs and ReverseGrpc.cs files. Include them in your project.
You can now create a client that calls the Go server
using System;
using Grpc.Core;
using Reverse;

namespace csharp.client
{
    internal class Program
    {
        private static void Main()
        {
            var channel = new Channel("127.0.0.1:50051", ChannelCredentials.Insecure);

            var client = new ReverseService.ReverseServiceClient(channel);

            var reply = client.ReverseString(new ReverseRequest
            {
                Data = "Hello, World"
            });

            Console.WriteLine("Got: " + reply.Reversed);

            channel.ShutdownAsync().Wait();

            Console.WriteLine("Press any key to exit...");
            Console.ReadKey();
        }
    }
}
Output
Got: dlroW ,olleH
Press any key to exit...
gRPC dotnet core client:
The dotnet core client was simple to build as the generated code is the same as for c#.
This is what I did:
- create dotnet core project
- add grpc dependencies
Include this in your package.json file:
"dependencies": {

  "Google.Protobuf": "3.0.0",
  "Grpc": "1.0.1",
},- generate csharp files (same as before).
- create the client (you can use the same client code as before)
- build
- run
Output:
...\dotnetcore.client> dotnet run
Project dotnetcore.client (.NETCoreApp,Version=v1.0) was previously compiled. Skipping compilation.
Got: dlroW ,olleH
Press any key to exit...
What else:
There are some more things I would like to try in the near future.
- streaming gRPC calls
- deploy a demo app to Google Cloud Pub/Sub to see how the deployment experience is.
Resources:
- grpc.io
- gRPC Motivation and Design Principles
- gRPC repo
- gRPC Go Quick start
- gRPC c# quickstart
- GothamGo 2015: gRPC: Google's high-performance, open-source RPC framework by Sameer Ajmani
- gotham-grpc demo code
- gRPC: a true internet-scale RPC framework is now 1.0 and ready for production deployments
- Google shares gRPC as alternative to REST for microservices
- protocol buffers - Language Guide
- Go support for Google's protocol buffers
- Practical guide to protocol buffers
- https://cloud.google.com/blog/big-data/2016/03/announcing-grpc-alpha-for-google-cloud-pubsub
Follow me at @santiago_arias to be notified about more posts like this.
SantiaagoMar 08, 2016
As in previous years, I would like to make a review of the year 2015.
Here is my github contributions for this year, as my current company works on github, this pumps up the numbers :p.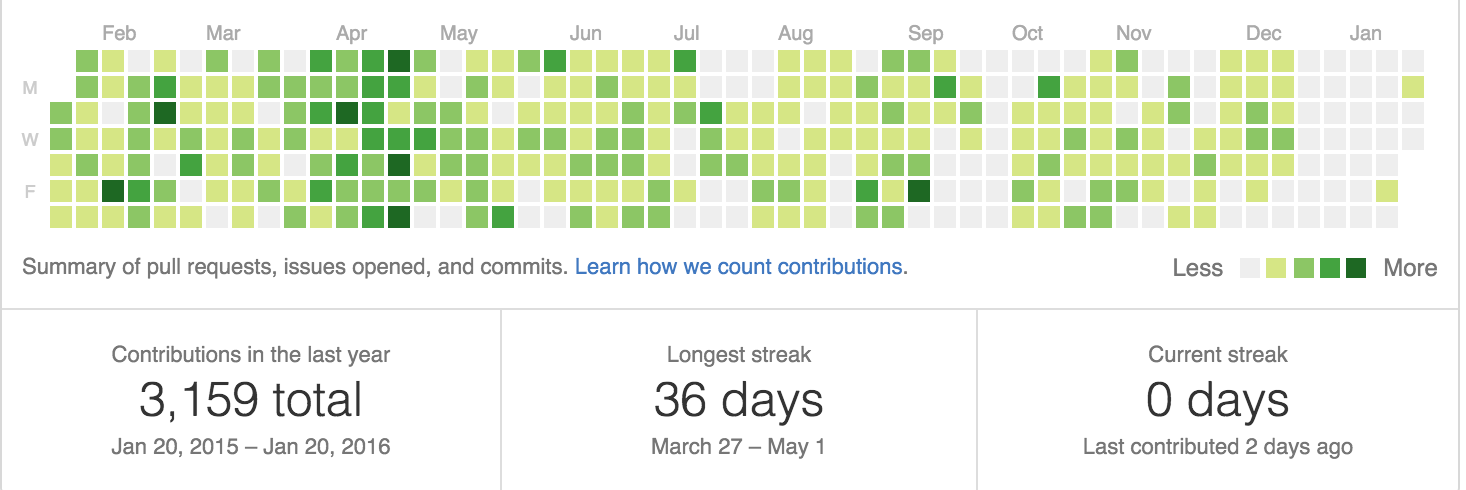
tinygraphs:
The main project that I finished in 2015 might have been tinygraphs. A web app that generates consistent avatars with different themes. The app is available on tinygraphs.com. The code is available at github.com/taironas/tinygraphs. It is under the taironas organization which I created to centralize apps that I code with friends. The app is done in Go and the front end is done in angularjs. While doing this app I learned many things about developing web applications and wrote the following articles:
- Building tinygraphs an avatar web service in Go
- Testing HTTP caching in Go
- Learning HTTP caching in Go
- Building a chessboard image in Go
- Playing with images in HTTP response in golang
route:
I also built a minimal Go package with Remy Jourde called route. This package handles http routing in Go web applications. This package is currently used in gonawin and tinygraphs apps.
idm:
I started coding idm (it doesn't matter) an interpreted programming language based on APL) and ivy.
This idea came after watching this two videos:
machine learning things:
One of the things I did during the past year was continue learning machine learning, a field that I am very passionate about. I followed the course Information Theory, Inference, and Learning Algorithms, the lectures available online.
I started to compete on simple machine learning problems in kaggle. I decided to have a repository to centralize the different competitions santiaago/kaggle. For this I set some conditions/challenges. First, all code had to be done in Go. Second, I had to code all algorithms and not use any framework. This forced me to start my own machine learning framework github.com/santiaago/ml right now it has linear regression, logistic regressions, support vector machines and linear transformations. As I was coding a different method the results of the competition improved. I would like to code neural networks models, random forest and PCA, that should be fun.
Project wish list for 2016:
As in previous years, this is what I wish to accomplish during this year:
- pomotime: is a web app to record your pomodoro progress This app is on hold as I have too much on my plate right now. This is done in Go, Dart and mongodb.
- xprize: I am participating with a friend on a competition called xprize, we are building some apps for tablets to teach kids to read, write and count. If you want more information go to the web site listed above. This is done in C++ and cocos2d-x. The deadline is around November 2016.
- I am working with a friend on a very interesting machine learning project that I cannot talk a lot about right now, but we should have a prototype ready for late 2016. This is currently done in python as most of the machine learning frameworks are in python.
- finish a deep learning course: I started a deep learning course by Udacity and google, the repository is available here
- ml framework: keep working on the machine learning framework, add neural networks, PCA and random forest.
- modify the ml framework to be in sync with other ml frameworks, mainly use the same terminology as other frameworks.
- keep doing some interesting Kaggle competitions.
Let's see what 2016 brings :-)
Follow me at @santiago_arias to be notified about more posts like this.Santiaago
Sep 15, 2015
At Golang Uk I learned from Andrew Gerrand's talk that you can define a type inside a function.
I was curious if doing this would impact the performance of the code.
Later the same day I asked the guy that sat next to me that same question. Turns out that guy was Alan Donovan who is one of the authors of go oracle.
Alan told me:
Both codes compile to the same assembly code so it doesn't matter if you define it inside or outside the function.
Very interesting, I didn't know that :).
The next week I was watching bradfitz talk Profiling & Optimizing in Go and decided to use the methods he described to answer this same question on my own.
So this is what I did.
I want to answer this question:
Does defining a type inside or outside a function impact the performance of my code?
Note: I think it is interesting to understand how Go works under the hood. I was interested in using the methods described on Brad's talk to answer my own questions. I am aware that you wouldn't normally bother about the performance implication of this trivial case.
Start with a simple package:
Let's start with a very simple package typo defined in typo.go that has a function fn.fn defines a type, creates an object of that type then returns a string representation of this object.
package typo

import "fmt"

func fn() string {
	type T struct {
		id    int
		value string
	}
	t := T{0, "hello"}
}
Writing a benchmark test for your package:
In Go you can define normal tests if they start with the Test word or benchmark test if they start with Benchmark word. This is very useful to measure performance. In our case, we will compare the performance of the Benchmark test when the type is defined inside and outside the function fn.
This is how you would create a benchmark test in a typo_test.go file:
func BenchmarkFn(b *testing.B) {
	for i := 0; i < b.N; i++ {
		fn()
	}
}
If you run this benchmark test this is what you get:
$ go test -v -run=^$ -bench=.
PASS
BenchmarkFn-8	 2000000	       648 ns/op
ok  	local/typo	1.970s
This means the loop ran 2000000 times at 648 ns per loop.
Running the pprof profiler:
Another tool that you can use is pprof, to know more about it check this link.
You can run a cpu profiler or a memory profiler.
Let's run the benchmark test with the -cpuprofile flag:
$ go test -v -run=^$ -bench=. -benchtime=2s -cpuprofile=prof.cpu
PASS
BenchmarkFn-8	 5000000	       659 ns/op
ok  	local/typo	3.981s
The benchmark test generates a file typo.test and with the cpuprofile flag it creates the prof.cpu file. With these files you can now run the pprof tool to see where the time is spent when the benchmark test is run. Some useful commands are top, top --cum, list yourFunctionName.
$ go tool pprof typo.test prof.cpu
Entering interactive mode (type "help" for commands)
(pprof) top
3.80s of 3.85s total (98.70%)
Dropped 18 nodes (cum <= 0.02s)
Showing top 10 nodes out of 34 (cum >= 3.20s)
      flat  flat%   sum%        cum   cum%
     3.76s 97.66% 97.66%      3.76s 97.66%  runtime.mach_semaphore_wait
     0.03s  0.78% 98.44%      0.03s  0.78%  runtime.mCentral_Grow
     0.01s  0.26% 98.70%      0.03s  0.78%  fmt.(*pp).printReflectValue
         0     0% 98.70%      0.03s  0.78%  fmt.(*pp).doPrintf
         0     0% 98.70%      0.03s  0.78%  fmt.(*pp).printArg
         0     0% 98.70%      0.06s  1.56%  fmt.Sprintf
         0     0% 98.70%      0.06s  1.56%  local/typo.BenchmarkFn
         0     0% 98.70%      0.06s  1.56%  local/typo.fn
         0     0% 98.70%      0.67s 17.40%  runtime.findrunnable
         0     0% 98.70%      3.20s 83.12%  runtime.gcstopm
(pprof) top --cum
3.76s of 3.85s total (97.66%)
Dropped 18 nodes (cum <= 0.02s)
Showing top 10 nodes out of 34 (cum >= 3.20s)
      flat  flat%   sum%        cum   cum%
         0     0%     0%      3.79s 98.44%  runtime.schedule
         0     0%     0%      3.79s 98.44%  runtime.systemstack
         0     0%     0%      3.77s 97.92%  runtime.stopm
     3.76s 97.66% 97.66%      3.76s 97.66%  runtime.mach_semaphore_wait
         0     0% 97.66%      3.76s 97.66%  runtime.notesleep
         0     0% 97.66%      3.76s 97.66%  runtime.semasleep
         0     0% 97.66%      3.76s 97.66%  runtime.semasleep.func1
         0     0% 97.66%      3.76s 97.66%  runtime.semasleep1
         0     0% 97.66%      3.38s 87.79%  runtime.goschedImpl
         0     0% 97.66%      3.20s 83.12%  runtime.gcstopm
In pprof you can see the time spent in function fn by doing list fn
(pprof) list fn
Total: 3.85s
ROUTINE ======================== local/typo.fn in /Users/santiaago/Developer/go/src/local/typo/typo.go
         0       60ms (flat, cum)  1.56% of Total
         .          .      7:		id    int
         .          .      8:		value string
         .          .      9:	}
         .          .     10:
         .          .     11:	t := T{0, "hello"}
         .       60ms     12:	return fmt.Sprintf("%+v", t)
         .          .     13:}
In the same way, you can also run the memory profiler using the -memprofile flag:
$ go test -v -run=^$ -bench=. -benchtime=2s -memprofile=prof.mem
PASS
BenchmarkFn-8	 5000000	       660 ns/op
ok  	local/typo	3.991s
If you run pprof on the memory profile:
$ go tool pprof typo.test prof.mem
Entering interactive mode (type "help" for commands)
(pprof) top
512.19kB of 512.19kB total (  100%)
Dropped 11 nodes (cum <= 2.56kB)
      flat  flat%   sum%        cum   cum%
  512.19kB   100%   100%   512.19kB   100%  runtime.malg
         0     0%   100%   512.19kB   100%  runtime.mcommoninit
         0     0%   100%   512.19kB   100%  runtime.mpreinit
         0     0%   100%   512.19kB   100%  runtime.rt0_go
         0     0%   100%   512.19kB   100%  runtime.schedinit
(pprof) top --cum
512.19kB of 512.19kB total (  100%)
Dropped 11 nodes (cum <= 2.56kB)
      flat  flat%   sum%        cum   cum%
  512.19kB   100%   100%   512.19kB   100%  runtime.malg
         0     0%   100%   512.19kB   100%  runtime.mcommoninit
         0     0%   100%   512.19kB   100%  runtime.mpreinit
         0     0%   100%   512.19kB   100%  runtime.rt0_go
         0     0%   100%   512.19kB   100%  runtime.schedinit
You can also check the memory in fn by doing list fn.
(pprof) list fn
Total: 512.19kB
ROUTINE ======================== local/typo.fn in /Users/santiaago/Developer/go/src/local/typo/typo.go
         0          0 (flat, cum)     0% of Total
         .          .      7:		id    int
         .          .      8:		value string
         .          .      9:	}
         .          .     10:
         .          .     11:	t := T{0, "hello"}
         .          .     12:	return fmt.Sprintf("%+v", t)
         .          .     13:}
Recording your results:
Let's record our results:
$ go test -bench=. -memprofile=prof.mem | tee mem.0
PASS
BenchmarkFn-8	 2000000	       686 ns/op
ok  	local/typo	2.045s

$ go test -bench=. -cpuprofile=prof.cpu | tee cpu.0
PASS
BenchmarkFn-8	 2000000	       672 ns/op
ok  	local/typo	2.045s
We can now move the type definition outside of the function and see if something changes.
package typo

import "fmt"

type T struct {
	id    int
	value string
}

func fn() string {
	t := T{0, "hello"}
	return fmt.Sprintf("%+v", t)
}
And record these results as well:
$ go test -bench=. -memprofile=prof.mem | tee mem.1
PASS
BenchmarkFn-8	 2000000	       638 ns/op
ok  	local/typo	1.933s

$ go test -bench=. -cpuprofile=prof.cpu | tee cpu.1
PASS
BenchmarkFn-8	 2000000	       639 ns/op
ok  	local/typo	1.944s
Compare your results:
you can compare the benchmarks with benchcmp:
$ go get golang.org/x/tools/cmd/benchcmp
$ benchcmp mem.0 mem.1
benchmark         old ns/op     new ns/op     delta
BenchmarkFn-8     686           674           -1.75%

$ benchcmp cpu.0 cpu.1
benchmark         old ns/op     new ns/op     delta
BenchmarkFn-8     672           691           +2.83%
I don't think these results are significant. So let's try something else.
Comparing the compiled assembly code:
Let's compare the assembly codes of fn. You can do this by doing disasm fn inside pprof.
Before:
(pprof) disasm fn
Total: 512.19kB
ROUTINE ======================== local/typo.fn
         0          0 (flat, cum)     0% of Total
         .          .      7daf0: GS MOVQ GS:0x8a0, CX
         .          .      7daf9: LEAQ -0x20(SP), AX
         .          .      7dafe: CMPQ 0x10(CX), AX
         .          .      7db02: JBE 0x7dc55
         .          .      7db08: SUBQ $0xa0, SP
         .          .      7db0f: XORL BX, BX
         .          .      7db11: MOVQ BX, 0xa8(SP)
         .          .      7db19: MOVQ BX, 0xb0(SP)
         .          .      7db21: XORL BX, BX
         .          .      7db23: XORL DX, DX
After:
(pprof) disasm fn
Total: 512.19kB
ROUTINE ======================== local/typo.fn
         0          0 (flat, cum)     0% of Total
         .          .      7daf0: GS MOVQ GS:0x8a0, CX
         .          .      7daf9: LEAQ -0x20(SP), AX
         .          .      7dafe: CMPQ 0x10(CX), AX
         .          .      7db02: JBE 0x7dc55
         .          .      7db08: SUBQ $0xa0, SP
         .          .      7db0f: XORL BX, BX
         .          .      7db11: MOVQ BX, 0xa8(SP)
         .          .      7db19: MOVQ BX, 0xb0(SP)
         .          .      7db21: XORL BX, BX
         .          .      7db23: XORL DX, DX
If you compare the two assembly codes of these functions you will find that they are identical. So it is true! That answers my question, defining types inside functions will not impact the performance in any way.
Another method:
Another way to get to the same result (credit to Alan Donovan who told me about this) is to run the following command twice one with the type defined inside the function and one outside.
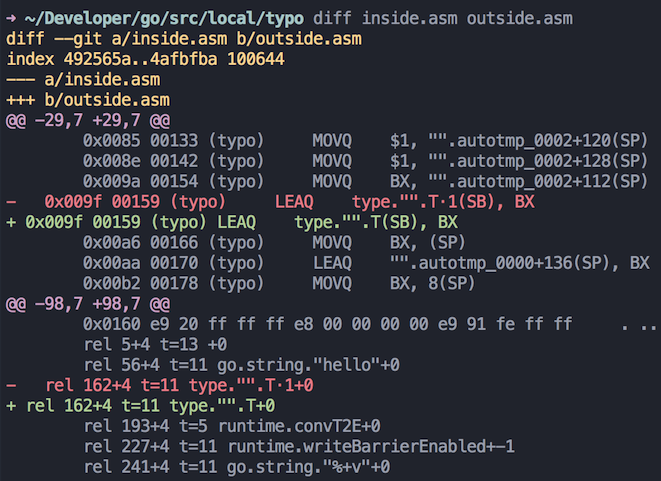
$ go tool compile -S typo.go | sed -e 's/\.go:[0-9]*//' -e '/^"".init/q' >in.asm
$ go tool compile -S typo.go | sed -e 's/\.go:[0-9]*//' -e '/^"".init/q' >out.asm
The sed script throws away line number information and truncates the disassembly at the start of the init.
You can then perform a diff between the two files.
$ diff in.asm out.asm
@@ -29,7 +29,7 @@
        0x0085 00133 (typo)     MOVQ    $1, "".autotmp_0002+120(SP)
        0x008e 00142 (typo)     MOVQ    $1, "".autotmp_0002+128(SP)
        0x009a 00154 (typo)     MOVQ    BX, "".autotmp_0002+112(SP)
-   0x009f 00159 (typo)     LEAQ    type."".T·1(SB), BX
+   0x009f 00159 (typo)     LEAQ    type."".T(SB), BX
        0x00a6 00166 (typo)     MOVQ    BX, (SP)
        0x00aa 00170 (typo)     LEAQ    "".autotmp_0000+136(SP), BX
        0x00b2 00178 (typo)     MOVQ    BX, 8(SP)
@@ -98,7 +98,7 @@
        0x0160 e9 20 ff ff ff e8 00 00 00 00 e9 91 fe ff ff     . .............
        rel 5+4 t=13 +0
        rel 56+4 t=11 go.string."hello"+0
-   rel 162+4 t=11 type."".T·1+0
+   rel 162+4 t=11 type."".T+0
        rel 193+4 t=5 runtime.convT2E+0
        rel 227+4 t=11 runtime.writeBarrierEnabled+-1
        rel 241+4 t=11 go.string."%+v"+0
The only difference between the two files is the type names, which are T.1 and T.
I hope these methods and go tools can help you answer your own questions.Go check bradfitz talk on Profiling & Optimizing in Go if you haven't already.
Follow me at @santiago_arias to be notified about more posts like this.
SantiaagoJun 16, 2015
I want to build a minimal web app using Golang for the backend and Dart and Angular 2.0 for the frontend.
The Github repository of this app is gda2 (for Golang Dart Angular2).
Here is the organization of this app:
GOPATH/src/github.com/santiaago/gda2 (master) tree
├── app
│   ├── pubspec.yaml
│   └── web
│       ├── index.html
│       ├── main.dart
└── backend
    └── main.go
The Backend
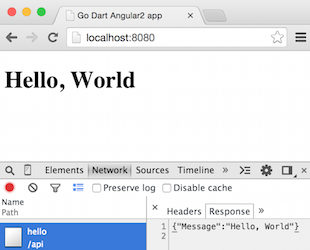
The Go server will serve the client side files that the app needs to run. Also it will serve a minimal api that returns a json object.
- request:
GET /api/hello - response:
{"Message":"hello world"}.
Here is the handler helloWorld that does that:
// helloWorld handler returns a json response with a 'Hello, World' message.
//
func helloWorld(w http.ResponseWriter, r *http.Request) {

    data := struct {
        Message string
    }{
        "Hello, World",
    }

    if err := json.NewEncoder(w).Encode(data); err != nil {
        log.Println(err)
    }
}
Now we need to serve that handler and serve the client side which is at /app/web.
func main() {
    http.Handle("/", http.FileServer(http.Dir("./app/web/")))

    http.HandleFunc("/api/hello", helloWorld)
    http.ListenAndServe(":8080", nil)
}
The frontend: Dart and Angular 2.0:
We start from the code of the quickstart project from angular.io.
// These imports will go away soon:
import 'package:angular2/src/reflection/reflection.dart' show reflector;
import 'package:angular2/src/reflection/reflection_capabilities.dart' show ReflectionCapabilities;

@Component(
  selector: 'my-app'
)
@View(
  template: '<h1>Hello </h1>'
)

class AppComponent {
    String name = 'Alice';
}
main() {
  // Temporarily needed.
  reflector.reflectionCapabilities = new ReflectionCapabilities();

  bootstrap(AppComponent);
}
And the following Index.html, also very similar to the quickstart code.
<!doctype html>
<html>
  <head>
    <title>Go Dart Angular2 app</title>
  </head>
  <body>
    <my-app></my-app>
    <script type="application/dart" src="main.dart"></script>
    <script src="packages/browser/dart.js"></script>
  </body>
</html>
Now we want to change this code to be able to call the api that we just made.
To do that we can create a Hello class and call HttpRequest.getString in the constructor to set a variable value to the response of /api/hello.
class Hello{

  String message;

  Hello(){
        HttpRequest.getString('/api/hello')
            .then((String content) {
              Map parsedMap = JSON.decode(content);
              message = parsedMap["Message"];
            })
            .catchError((Error error) {
              print(error.toString());
            });
  }
}
The next step is to create an instance of Hello in AppComponent
class AppComponent {
  Hello hello = new Hello();
}
And then use it in the template:
@Component(
  selector: 'my-app'
)
@View(
  template: '<h1>"{{hello.message}}"</h1>'
)
And that's it! Now if we get the libraries, build and run the app:
> cd app
> pub get
> cd ..
> go get ./backend
>backend
You can now open Chromium you will see the following:
Here are some links that helped me understand this:
I hope you have found this post useful, if you have any feedback, please let me know, I would be more than happy to improve the code and learn at the same time.
Follow me at @santiago_arias to be notified about more posts like this.
SantiaagoApr 14, 2015
I just finished a project called tinygraphs with the help of some friends. You can find it on github.com/taironas/tinygraphs. It was built in Go and the website was done with Boostrap and AngularJS and designed by +Carmen. This post is about how and why we built this.
The idea
The idea came to life after we finished the first version of gonawin, a web app to make friendly bets on sport events. We built it to play during the Fifa World Cup and needed some avatars for our users. We found an avatar generator built in Go called Sigil and we used it for the avatars of our users and teams. After the World Cup came to an end we decided to build our own avatar generator web service. Our aim was to have a greater variety of color themes and patterns, other than the traditional square patterns.
The patterns:
We started with the square pattern, a 6x6 grid that is symetric in Y.
We then moved towards something different. We decided to call it isogrids. It is composed by small triangles and is symmetric in Y.
The next pattern is a small derivation of the isogrid pattern, we called it hexa in reference to the hexagon shape. It is basically a cleaner version of an isogrid avatar.
The hexa16 route is a great pattern, it is composed of 6 triangles that rotate to create an hexagon. Each triangle is a rotation of the previous one starting in the middle left.
The spaceinvaders pattern was one of the funniest to code. It is a 10x10 grid. A space invader is defined by multiple parameters, number of antennas, number of eyes, size of arms, arms up or down, ...
type invader struct {
	legs        int
	foot        bool
	arms        int
	armsUp      bool
	anthenas    int
	height      int
	length      int
	eyes        int
	armSize     int
	anthenaSize int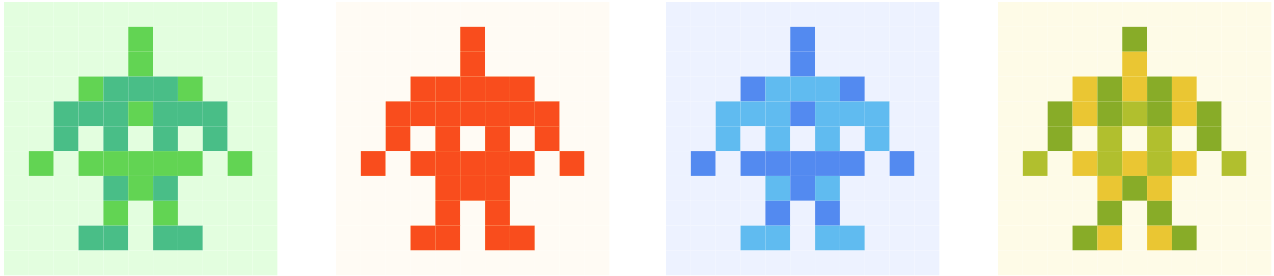
All the information needed to create these patterns is derived from the key passed in the URL. In this case helloworld. Let's see how the avatars are generated.
How the avatars are generated
We create an MD5 key from the string passed in the URL.
From this URL http://tinygraphs.com/spaceinvaders/helloworld we extract the helloworld identifier that generates an MD5 key: fc5e038d38a57032085441e7fe7010b0.
// SpaceInvaders handler for /spaceinvaders/:key
func SpaceInvaders(w http.ResponseWriter, r *http.Request) {
	var err error
	var key string
	if key, err = route.Context.Get(r, "key"); err != nil {
		log.Println("Unable to get 'key' value: ", err)
		key = ""
	}

	h := md5.New()
	io.WriteString(h, key)
	key = fmt.Sprintf("%x", h.Sum(nil)[:])
	// ...
The generated key is an hexadecimal key. For each of the first 16 characters of the key we extract an information to create the avatar. In most cases each character is decoded into one of the colors that composes the avatar that we are building. In the case of the spaceinvaders pattern, each character of the key let us extract information such as, how many eyes does this space invader has? or, does he has antennas?, etc..
What I learned while building tinygraphs:
Mostly how to work with images and how to use svgo a Go Language Library for SVG generation. I have made some blog posts about some of the things I learned while building tinygraphs:
- Testing HTTP caching in Go
- Learning HTTP caching in Go
- Building a chessboard image in Go
- Playing with images in HTTP response in golang
Hosting a Go web app on Heroku:
I had never properly used heroku before this. The development experience is great for a basic app (We do not even have a database :) ). There is a buildpack for Go here and here is an article to Get started with Go on Heroku.
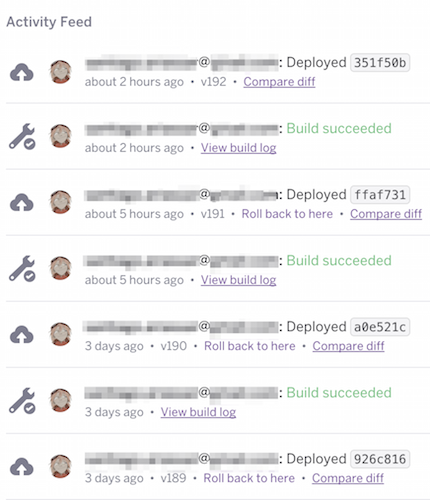
One of the great things that came with Heroku is that there is a github integration.
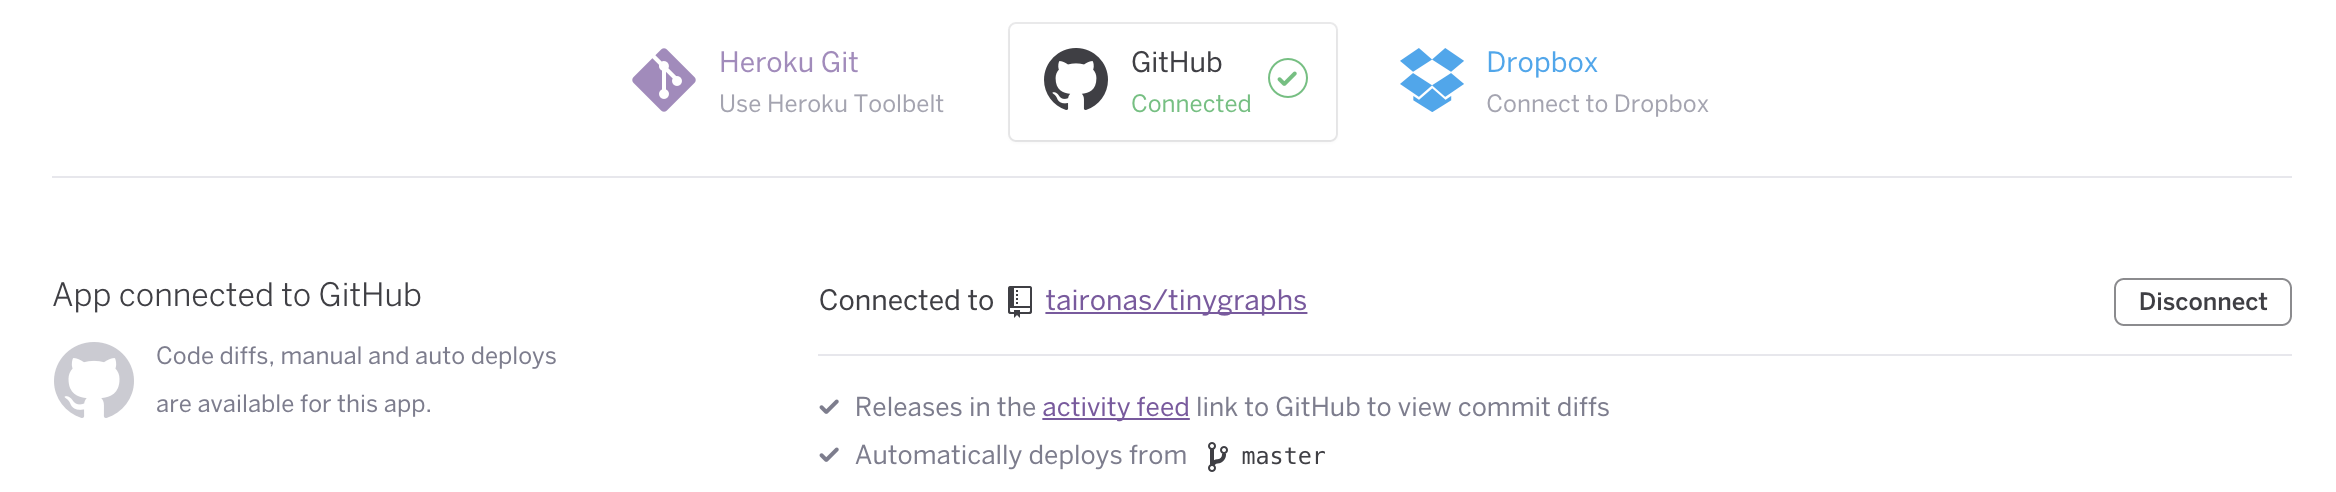
You can configure it so that every push to master triggers a build and is automatically deployed.
I hope you have found this post useful.
Follow me at @santiago_arias to be notified about more posts like this.
SantiaagoFeb 16, 2015
I have written some posts on building images in an HTTP response and how to cache them. This post is about how to test all of this and verify that you are testing the right thing.
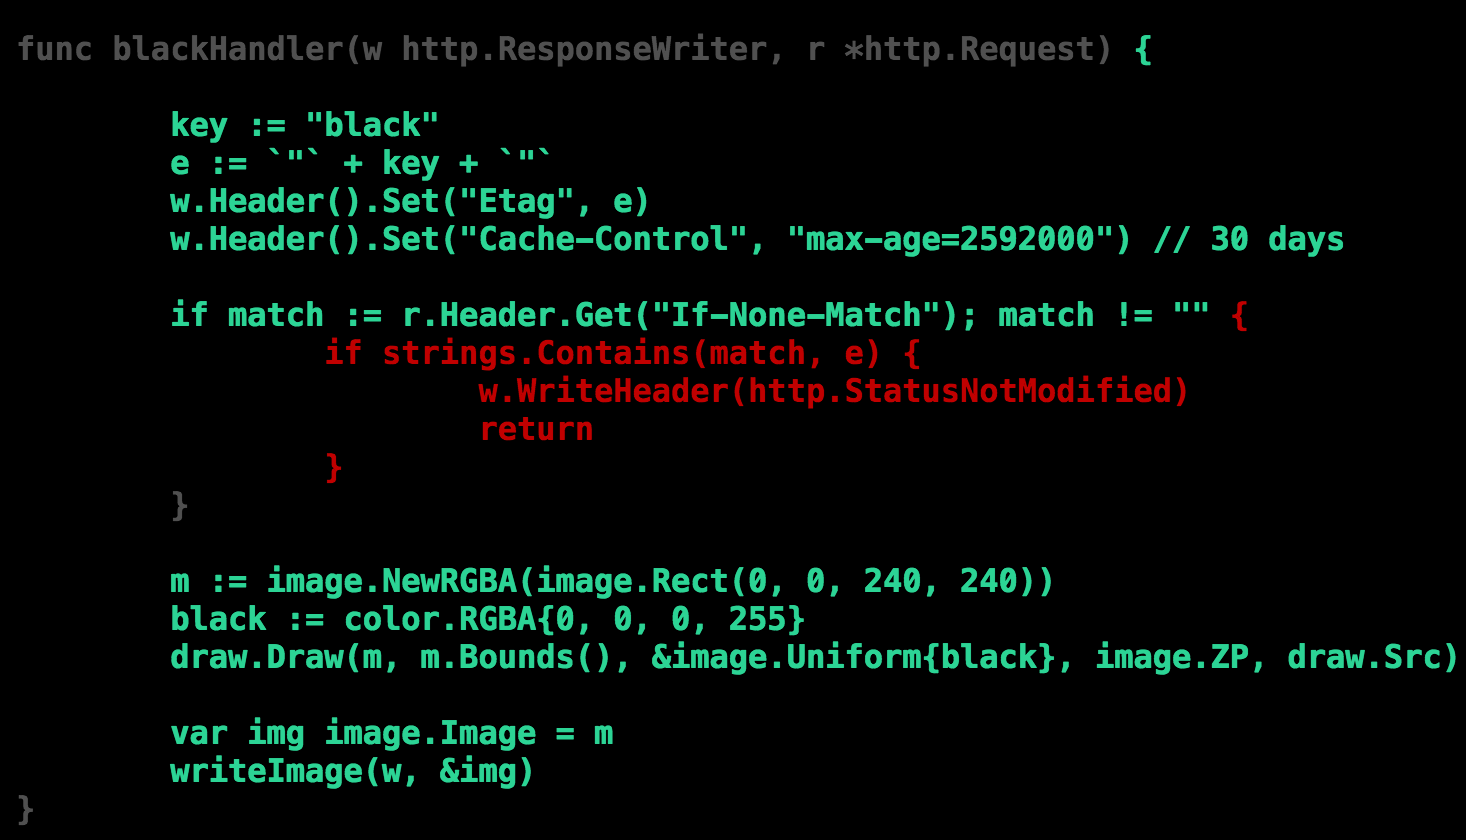
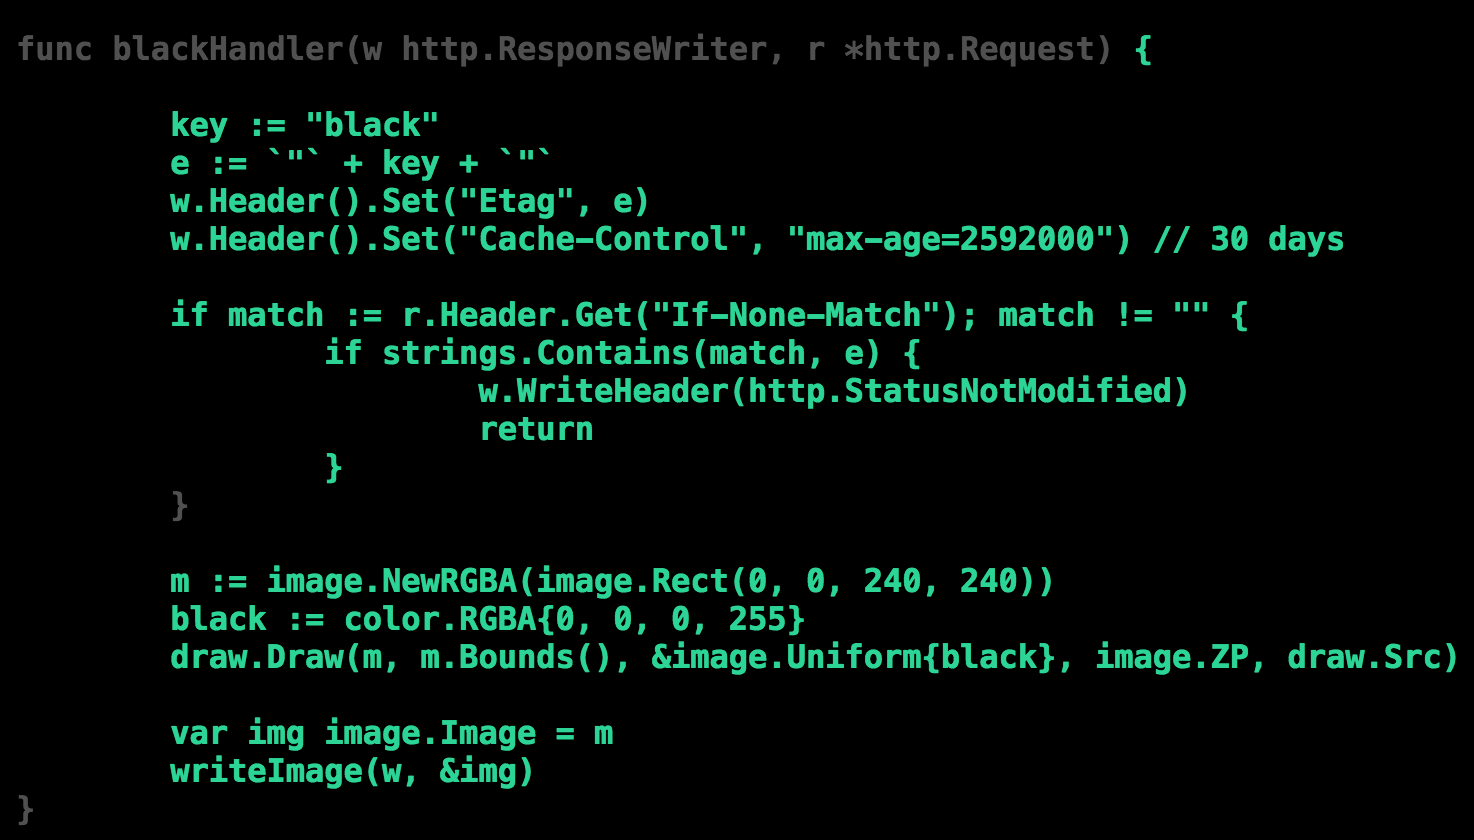
This is the code that we are starting with:
func blackHandler(w http.ResponseWriter, r *http.Request) {

    key := "black"
    e := `"` + key + `"`
    w.Header().Set("Etag", e)
    w.Header().Set("Cache-Control", "max-age=2592000") // 30 days

    if match := r.Header.Get("If-None-Match"); match != "" {
        if strings.Contains(match, e) {
            w.WriteHeader(http.StatusNotModified)
            return
        }
    }

    m := image.NewRGBA(image.Rect(0, 0, 240, 240))
    black := color.RGBA{0, 0, 0, 255}
    draw.Draw(m, m.Bounds(), &image.Uniform{black}, image.ZP, draw.Src)

    var img image.Image = m
    writeImage(w, &img)
}
writeImage is a function that writes an image into a http.ResponseWriter (to read more about this go to my previous post Playing with images in HTTP response in golang).
Testing the handler:
Lets start by making a first test to blackHandler. This is done by using the httptest package. We call the NewRecorder() function which creates a ResponseRecorder object.
This is great because you can use the recorder as any http.ResponseWriter and also use it to check the response that comes from the handler. In this case, we can check that the HTTP response code is equal to http.StatusOK
package main

import (
    "net/http"
    "net/http/httptest"
    "testing"
)

func TestBlackHandler(t *testing.T) {

    blackHandlerFunc := http.HandlerFunc(blackHandler)
    if r, err := http.NewRequest("GET", "", nil); err != nil {
        t.Errorf("%v", err)
    } else {
        recorder := httptest.NewRecorder()
        blackHandlerFunc.ServeHTTP(recorder, r)
        if recorder.Code != http.StatusOK {
            t.Errorf("returned %v. Expected %v.", recorder.Code, http.StatusOK)
        }
    }
}
Lets run our test.
    $ go test
    PASS
    ok  	local/cache	0.011s
local/cache is the path of my project in $GOPATH/src/local/cache
Test coverage:
Now lets measure our test coverage for this test. Go comes with a tool called cover and a great article that explains all you need to know about it.
Lets start running the test coverage:
    $ go test -cover
    PASS
    coverage: 57.7% of statements
    ok  	local/cache	0.012s
We know we are not covering the main() function. This might explain why we have a lower percentage of coverage. Lets see what our test really covers:
    go test -coverprofile=coverage.out
    go tool cover -html=coverage.out
This will open the following view in your browser:
This is quite interesting, our test is covering most of the blackHandler function, but not the code that deals with the cache.
We need to improve our test so that the cache code is also covered.
Testing the cache:
To test the cache code we need to build a second request with the Etag of the first request (If this is new to you, you might want to check Learning HTTP caching in Go).
This can easily be done with the ResponseRecorder type from the httptest package, since the ResponseRecorder is an implementation of the http.ResponseWriter. So you can read information from it like you would do with a http.ResponseWriter type.
You can read the Header for the Etag value.
    // record etag to test cache
    etag = recorder.Header().Get("Etag")
We then use the Etag when building our second request by setting it in the If-None-Match in the http.Header.
if r, err := http.NewRequest("GET", "", nil); err != nil {
    t.Errorf("%v", err)
} else {
    r.Header.Set("If-None-Match", etag)
    ...
The last thing to do is to check this time that the response.Code is equal to http.StatusNotModified.
This is how our test looks now:
package main

import (
    "net/http"
    "net/http/httptest"
    "testing"
)

func TestBlackHandler(t *testing.T) {

    blackHandlerFunc := http.HandlerFunc(blackHandler)
    var etag string

    // first request
    if r, err := http.NewRequest("GET", "", nil); err != nil {
        t.Errorf("%v", err)
    } else {
        recorder := httptest.NewRecorder()
        blackHandlerFunc.ServeHTTP(recorder, r)
        if recorder.Code != http.StatusOK {
            t.Errorf("returned %v. Expected %v.", recorder.Code, http.StatusOK)
        }
        // record etag to test cache
        etag = recorder.Header().Get("Etag")
    }

    // test caching
    if r, err := http.NewRequest("GET", "", nil); err != nil {
        t.Errorf("%v", err)
    } else {
        r.Header.Set("If-None-Match", etag)
        recorder := httptest.NewRecorder()
        blackHandlerFunc.ServeHTTP(recorder, r)
        if recorder.Code != http.StatusNotModified {
            t.Errorf("returned %v. Expected %v.", recorder.Code, http.StatusNotModified)
        }
    }
}
Let's see our coverage now:
    $ go test -cover
    PASS
    coverage: 69.2% of statements
    ok  	local/cache	0.010s
That is better, lets check the coverage of the blackHandler function:
    go test -coverprofile=coverage.out
    go tool cover -html=coverage.out
That looks nice! :) As I said before, the reason why we do not get 100% coverage is because there is no test covering main() and error handling code in writeImage(). But the important part was to properly test the blackHander function.
The final example is available in this gist
I hope you found this post useful and that this will help you build proper tests for your applications.
Here are some resources that helped me come up with this article:
Follow me at @santiago_arias to be notified about more posts like this.Santiaago
Jan 19, 2015
When you are building a web app, you want to make sure that you are caching the app's resources. So if for example a specific URL always delivers the same image, you want to cache it in the browser to avoid unnecessary traffic and have a better web performance.
For the rest of this post I suppose you have the following web application. It generates an image when the /black/ URL is called. I would like to cache that image.
package main

import (
    "bytes"
    "flag"
    "image"
    "image/color"
    "image/draw"
    "image/jpeg"
    "log"
    "net/http"
    "strconv"
)

var root = flag.String("root", ".", "file system path")

func main() {
    http.HandleFunc("/black/", blackHandler)
    http.Handle("/", http.FileServer(http.Dir(*root)))
    log.Println("Listening on 8080")
    err := http.ListenAndServe(":8080", nil)
    if err != nil {
        log.Fatal("ListenAndServe:", err)
    }
}

func blackHandler(w http.ResponseWriter, r *http.Request) {
    m := image.NewRGBA(image.Rect(0, 0, 240, 240))
    black := color.RGBA{0, 0, 0, 255}
    draw.Draw(m, m.Bounds(), &image.Uniform{black}, image.ZP, draw.Src)

    var img image.Image = m
    writeImage(w, &img)
}

// writeImage encodes an image in jpeg format and writes it into ResponseWriter.
func writeImage(w http.ResponseWriter, img *image.Image) {

    buffer := new(bytes.Buffer)
    if err := jpeg.Encode(buffer, *img, nil); err != nil {
        log.Println("unable to encode image.")
    }

    w.Header().Set("Content-Type", "image/jpeg")
    w.Header().Set("Content-Length", strconv.Itoa(len(buffer.Bytes())))
    if _, err := w.Write(buffer.Bytes()); err != nil {
        log.Println("unable to write image.")
    }
}
How to cache?
This subject is new to me, I didn't know you could set some caching information in the HTTP headers (there is so much to learn :-) ).
This is what the HTTP header of /black/ looks like right now:
santiaago$ curl -I localhost:8080/black/
HTTP/1.1 200 OK
Content-Length: 1493
Content-Type: image/jpeg
Date: Sun, 18 Jan 2015 14:17:37 GMT
There are two things that can be done in order to cache this HTTP request:
Setting an etag:
An etag or entity tag is a mechanisms that HTTP provides to deal with caching. If you ask multiple times for the same resource you get the resource for free once it is cached.
The etag is what will identify a specific resource so it should be a unique key in your web app.
In Go this is how you could set the etag in the HTTP header:
func Handler(w http.ResponseWriter, r *http.Request) {
    key := "somekey"
    e := `"` + key + `"`
    w.Header().Set("Etag", e)
    ...
Reading the HTTP request:
Suppose you send the HTTP response to the client and he asks for the same resource again. In this case you need to read the HTTP header of the HTTP.request and check the If-None-Match field. This field will have the etag key value if the client has already asked for that resource.
If there is a match between the If-None-Match field and the key you generate in the server, there is no need to rebuild the image again as the browser already has it. In that case set the HTTP status to StatusNotModified ie 304 and return.
if match := r.Header.Get("If-None-Match"); match != "" {
    if strings.Contains(match, e) {
        w.WriteHeader(http.StatusNotModified)
        return
    }
}
Setting cache-control:
Setting cache-control to a specific date tells the client that once the date expires the cache should revalidate the resource. You can also set the cache-control value to other values. This resource is great to understand cache-control: A Beginner's Guide to HTTP Cache Headers
This is how you could set your cache in Go:
w.Header().Set("Cache-Control", "max-age=2592000") // 30 daysAll together:
func blackHandler(w http.ResponseWriter, r *http.Request) {

    key := "black"
    e := `"` + key + `"`
    w.Header().Set("Etag", e)
    w.Header().Set("Cache-Control", "max-age=2592000") // 30 days

    if match := r.Header.Get("If-None-Match"); match != "" {
        if strings.Contains(match, e) {
            w.WriteHeader(http.StatusNotModified)
            return
        }
    }

    m := image.NewRGBA(image.Rect(0, 0, 240, 240))
    black := color.RGBA{0, 0, 0, 255}
    draw.Draw(m, m.Bounds(), &image.Uniform{black}, image.ZP, draw.Src)

    var img image.Image = m
    writeImage(w, &img)
}
Testing:
Once your handler is ready to cache, you want to test that everything is in place.
The first thing you can do is take a look at the Network section in Chrome Developer tools or any dev tools you have.
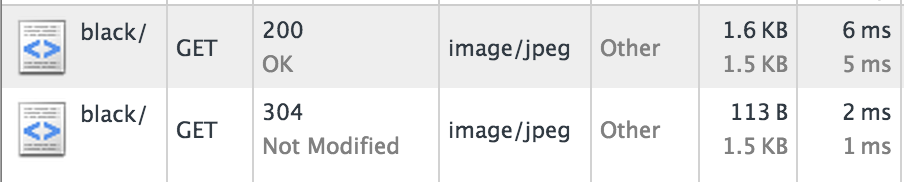
Ask for your resource, in this case localhost:8080/black/. You should get a Status 200 OK, then hit a refresh and check that the Status has now changed to 304 StatusNotModified. You can also notice that the latency of the second request is shorted than the first one.
If you take a look at the HTTP header of the response you should be able to check the Etag and Cache-Control values.
You can also do this with curl by running the following command:
santiaago$ curl -I localhost:8080/black/
HTTP/1.1 200 OK
Cache-Control: max-age=2592000
Content-Length: 1493
Content-Type: image/jpeg
Etag: "black"
Date: Sun, 18 Jan 2015 14:41:31 GMT
The final example is available in this gist
Some links that helped understand this:
- Etag wiki
- SO if-midified-since vs if-none-match
- A Beginner's Guide to HTTP Cache Headers
- SO html cache control max age
- Don't rape HTTP: If-(None-)Match & the 412 HTTP status code
- Caching in HTTP
- HTTP caching - Google Web Fundamentals
- Go HTTP package
Follow me at @santiago_arias to be notified about more posts like this.Santiaago
Jan 12, 2015
I have been building images in Go and I would like to share how to build a chessboard image pattern with some modulo operations. In my case I am building a 6x6 grid of size 240px. That means each square is a 40px square.
I would like to build an image where one square (40x40) is black the next one white and so on. Also the colors alternate between each row.

Looping through the image:
To be able to make this chessboard we first need to loop through the X's and Y's of the image. Here is how you would create a black image by coloring each "pixel" in black.
func drawBlack(m *image.RGBA, color1 color.RGBA) {
    size := m.Bounds().Size()
    for x := 0; x < size.X; x++ {
        for y := 0; y < size.Y; y++ {
            m.Set(x, y, color1)
        }
    }
}
Saving the image:
This is how you could save the image you built:
func main() {
    m := image.NewRGBA(image.Rect(0, 0, 240, 240))
    black := color.RGBA{uint8(0), uint8(0), 0, 255}

    drawBlack(m, black)

    if img, err := os.Create("black.jpg"); err != nil {
        log.Println("unable to create black.jpg: %v", err)
    } else {
        jpeg.Encode(img, m, nil)
        defer img.Close()
    }
}
modulo of ...:
The first thing that came to mind my mind was that I should use modulo of something..
We have a 2 level loop through X's and Y's. Let's try to build an image that draws black if x%2 == 0 and draws white otherwise.
func drawModuloOnX(m *image.RGBA, color1, color2 color.RGBA) {
    size := m.Bounds().Size()
    for x := 0; x < size.X; x++ {
        for y := 0; y < size.Y; y++ {
            if x%2 == 0 {
                m.Set(x, y, color1)
            } else {
                m.Set(x, y, color2)
            }
        }
    }
}
This is the image that we get:
If we do instead
y%2 == 0 we get the following:
How about
(x+y)%2 == 0?
Well, we are getting closer, but this is making a chessboard grid of 240x240 and what we want is a 6x6 chessboard grid. That means, to color a specific range/square with black and another range/square in white.
Indexes and ranges:
In order to color the image by a specific range let's take first a look at the first row of the image:
This is the index of that first row:
0 1 2 ... 38 39 40 41 ... 78 79 80 81 ... 118 119 120 121 ... 158 159 160 161 ... 198 199 200 201 ... 238 239If we can get an array of the first row of the 6x6 grid to have 0 if the color is black and 1 if it is white, we are in good shape. We would like to build an array that transforms the indexes of this first row in the following:
indexes: 0 1 2 ... 38 39 40 41 ... 78 79 80 81 ... 118 119 120 121 ... 158 159 160 161 ... 198 199 200 201 ... 238 239To do this we need to first divide the indexes by the size of a square in this case 40. We get the following pattern:
transform:0 0 0 ... 0 0 1 1 ... 1 1 0 0 ... 0 0 1 1 ... 1 1 0 0 0 0 1 1 ... 1 1
indexes: 0 1 2 ... 38 39 40 41 ... 78 79 80 81 ... 118 119 120 121 ... 158 159 160 161 ... 198 199 200 201 ... 238 239This is close to what we want. If we use the modulo of 2 now on the result of the previous array we get:
/40: 0 0 0 ... 0 0 1 1 ... 1 1 2 2 ... 2 2 3 3 ... 3 3 4 4 ... 4 4 5 5 ... 5 5
indexes:  0 1 2 ... 38 39 40 41 ... 78 79 80 81 ... 118 119 120 121 ... 158 159 160 161 ... 198 199 200 201 ... 238 239
transform:0 0 0 ... 0  0  1  1  ... 1  1  0  0  ... 0   0   1   1   ... 1   1   0   0       0   0   1   1   ... 1   1
This looks good, let's build the image!
func draw(m *image.RGBA, color1, color2 color.RGBA) {
    size := m.Bounds().Size()
    quadrant := size.X / 6
    for x := 0; x < size.X; x++ {
        val := (x / quadrant) % 2
        for y := 0; y < size.Y; y++ {
            if val == 0 {
                m.Set(x, y, color1)
            } else {
                m.Set(x, y, color2)
            }
        }
    }
}
Notice that in our case size = 240 andquadrant = 40.Now if we create our image using the above algorithm we get the following:

Similarly if we now do
val = (y / quadrant) %2 we get the following:
Combining values:
As in section "modulo of ...", if we combine the vertical and horizontal values and compute a modulo:
func drawGrid(m *image.RGBA, color1, color2 color.RGBA) {
    size := m.Bounds().Size()
    quad := size.X / 6
    for x := 0; x < size.X; x++ {
        val := (x / quad) % 2
        for y := 0; y < size.Y; y++ {
            val2 := (y / quad) % 2
            if (val+val2)%2 == 0 {
                m.Set(x, y, color1)
            } else {
                m.Set(x, y, color2)
            }
        }
    }
}
We finally get the following \o/:I hope you found this interesting. Here is the final example also available in this gist
Some links that helped me making this:
Follow me at @santiago_arias to be notified about more posts like this.Santiaago
Dec 30, 2014
As in previous years, I would like to make a review of the year 2014. A lot of things happened: new job, new home, new city, new country. Doing all of that was not an easy task and takes a lot of time. Yet, I was able to achieve multiple goals and continue learning :-).
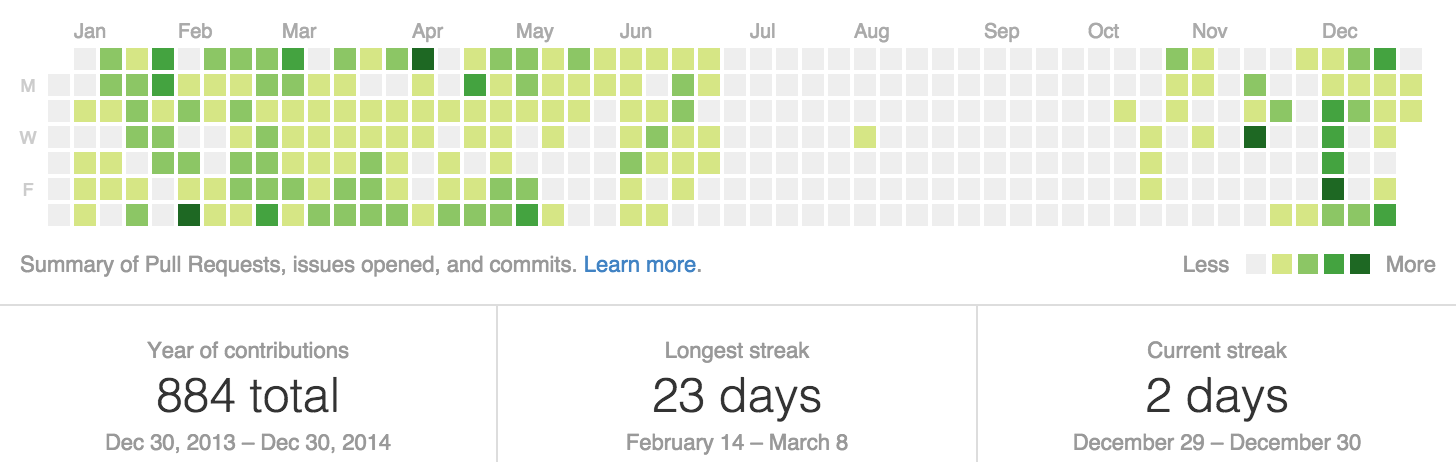
Here is my github contributions this year. You can see that big gap between July and October. This was the time when all the changes happened, interviews, new job, relocation, ...
gonawin:
The main project of this year was gonawin, a social web application which I did with Remy Jourde and Carmen to make friendly bets on sport games with your friends. The repository is on github with the name of gonawin.
It was built in Go, Google App Engine and AngularJS. We got a total of 81 users and about 50 active users for the world cup. We are planning to continue working on this project and keep improving it step by step.
Moocs:
The only online course that I made this year was Learning from data. I had already done this course in python here, but I decided to do it again in Go. I haven't finished it yet, right now I am doing the implementation of Support Vector Machines. There are two reasons on why I am doing this course again. The first one is to continue learning Go. The second reason is that I want to build my own Machine learning framework in Go in order to use it in future projects that I have in mind. One of them is a Machine Learning Visualizer built in Go and d3.js. The github repository for this online course is available: here
Continue learning Go:
I set this as one of my goals for 2013, and I continue to progress in this topic. I did several projects in order to learn more about this language.
The main one was gonawin, a web application whose backend is written in Go.
After we finished this app, we decided to start refactoring some parts of the code and improving the app itself. So we created a github organization called taironas and we are currently working on two projects:
- route, a URL router that allows regex expression in URL paths.
- tinygraphs, an avatar generator web service.
More learning:
Books I have read and worked on:
- The algorithm design manual
- Mainly some reading through the first 6 chapters and I started coding the exercises of the first 2 chapters in this repo.
- Cracking the coding interview
- This is a great book if you want to get in shape and ready for some interviews.
Project wish list for 2015:
Here is what I wish to accomplish this year:
- Finish main work on the route package.
- Finish first version of the web service avatar generator tinygraphs.
- Enhance gonawin.
- Finish caltechx.go
- Extract the machine learning code from caltechx.go into a separate repo.
- Make a web site to visualize machine learning models and methods using d3.js.
- Any interesting unplanned project :-)
Let's see what 2015 brings. :-)Santiaago
Dec 26, 2014
I am currently building an avatar generator with rjourde in Go.
In the process of doing it I am learning about how to create images on the fly and display them in an html page.
Here is what I found today:
Objective
I want to have a simple web server, with two entry points: /blue and /red.
This two entry points will display a blue or red image that will be created on the fly.
    var root = flag.String("root", ".", "file system path")

    func main() {
        http.HandleFunc("/blue/", blueHandler)
        http.HandleFunc("/red/", redHandler)
        http.Handle("/", http.FileServer(http.Dir(*root)))
        log.Println("Listening on 8080")
        err := http.ListenAndServe(":8080", nil)
        if err != nil {
            log.Fatal("ListenAndServe:", err)
        }
    }
Building an image:
For this specific example there is no much complexity in the image I want to create. So a simple RGBA image will do the work. We do this with three golang packages: image, image/color, image/draw.
    m := image.NewRGBA(image.Rect(0, 0, 240, 240))
    blue := color.RGBA{0, 0, 255, 255}
    draw.Draw(m, m.Bounds(), &image.Uniform{blue}, image.ZP, draw.Src)
Write image to http.ResponseWriter:
Now that we have a proper image, we need to send an HTTP response with it. I found two ways to do this:
Option 1: Send an HTTP response of type image/jpeg:
The first option is to write an HTTP response of typeimage/jpeg or any format you want. This is what WriteImage does:
// writeImage encodes an image 'img' in jpeg format and writes it into ResponseWriter.This is quite straight forward:
func writeImage(w http.ResponseWriter, img *image.Image) {
buffer := new(bytes.Buffer)
if err := jpeg.Encode(buffer, *img, nil); err != nil {
log.Println("unable to encode image.")
}
w.Header().Set("Content-Type", "image/jpeg")
w.Header().Set("Content-Length", strconv.Itoa(len(buffer.Bytes())))
if _, err := w.Write(buffer.Bytes()); err != nil {
log.Println("unable to write image.")
}
}
- Get an
Image - Encode it with a specific format.
- Write the array of bytes to the
http.ResponseWriterusing the Write function.
Option 2: Use a http/template to send the image:
First we define a template that reads a raw image encoded in base 64:
var ImageTemplate string = `<!DOCTYPE html>Then we create a function that use this template:
<html lang="en"><head></head>
<body><img src="data:image/jpg;base64,{{.Image}}"></body>`
// writeImageWithTemplate encodes an image 'img' in jpeg format and writes it into ResponseWriter using a template.Notice that we are using the package encoding/base64 in order to transform the image in a raw image.
func writeImageWithTemplate(w http.ResponseWriter, img *image.Image) {
buffer := new(bytes.Buffer)
if err := jpeg.Encode(buffer, *img, nil); err != nil {
log.Println("unable to encode image.")
}
str := base64.StdEncoding.EncodeToString(buffer.Bytes())
if tmpl, err := template.New("image").Parse(ImageTemplate); err != nil {
log.Println("unable to parse image template.")
} else {
data := map[string]interface{}{"Image": str}
if err = tmpl.Execute(w, data); err != nil {
log.Println("unable to execute template.")
}
}
}
str := base64.StdEncoding.EncodeToString(buffer.Bytes())This is important, if you don't do this and only pass an array of bytes the browser will not be able to generate the image as it expects an image encoded in base64.
If you look at the generated HTML source code you would see something like this:
<!DOCTYPE html>
<html lang="en"><head><title></title></head>
<body>
<img src="data:image/jpg;base64,/9j/2wCEAAgGBgc....KKAP/2Q==">
</body>
All together:
Here is the full example also available in this gist
Some links that helped me find this:
Dec 24, 2014
Usually when you work on a specific issue or a new feature you could end up with a lot of local commits in order to track your progress as you try different things (even have multiple local branches). At the end of your day you have a final solution that you feel confortable with and you want to push that into master.
But when you list your commits, git log --oneline --decorate -10 there might be many unnecessary commits. You probably do not want all that commit history in your working branch as that would blur your view on what was really done.
In that case one option is to merge the local commits and make a new set of commits that truly describe your work.
After some investigation, I found this StackOverflow question: how to merge local commits at a develop branch in git
Here is what has worked for me:
git checkout mybranchWhere the
git merge-base mybranch origin/master
git reset commitId
git commit -m "merge commits"
git merge master mybranch
git push
commitId is something like ac8fbef. This is the commit id of the most recent commit before you start your work. To get this id you probably want to list the last x commits: git log --oneline --decorate -10So if I make 4 commits:
git commit -m "start work on foo"And my git log would look like this:
git commit -m "new method"
git commit -m "refactor"
git commit -m "changing foo to be foobar instead"
git log --oneline --decorate -5In this case I want to make a
80a16bc changing foo to be foobar instead
987589e refactor
16d224d new method
2246fc6 start work on foo
ac8fbef fixes error on bar
git reset ac8fbef. This will put all the changes that were done on mybranch into the modified files and remove the commits I made locally.
If you do a git status, you will see all the files that you changed during your day of work (during the 4 commits I took as examples). You can now split those changes into separate and concise commits and push that into master or any branch you are working on. Your commit history is clean and does not have unnecessary commits!
In the past days I had to build a script to insert some lines of code after a specific statement.
For example, I have the following file:
a > bAnd I need to add a line
a = foo(c)
b = 2
b = foo(b)
foo
bar
foobar
b = foo(v)
variable = bar(42) after every line of variable = foo(x)After that treatment my file would be like this:
a > bAlso, I had to perform this task on multiple files at the same time, the files are listed in a visual studio search result that will look like this:
a = foo(c)
a = bar(42)
b = 2
b = foo(b)
b = bar(42)
foo
bar
foobar
c = foo(v)
c = bar(42)
    Find all "foo(", Subfolders, Find Results 1, "c:\", "*.txt"
      C:\file1.txt(2):a = foo(c)
      C:\file1.txt(4):b = foo(b)
      C:\file1.txt(8):c = foo(v)
      C:\file2.txt(2):a1 = foo(c)
      C:\file2.txt(4):a3 = foo(b)
      C:\file2.txt(8):variable1 = foo(v)
      Matching lines: 6    Matching files: 2    Total files searched: 214
      Find was stopped in progress.
So we need a way to get the set of files from the visual studio search result and then run the task on each of them.Here is the main algorithm where:
LINE_TO_INSERTis the line to insert, in this case= bar(42)\nPATTERN_OF_LINEin the pattern after which we insert the line
In this case'\w+' + '\\ \\=\\ foo\\(' + '\w+'which matches witha = foo(b)for examplePATTERN_OF_FILEis the pattern of the files we are looking for in the visual studio search result
insert_in_files().
    def insert_in_files():
    	'''Insert LINE_TO_INSERT after all lines with pattern PATTERN_OF_LINE in all files with PATTERN_OF_FILE'''
    	files = get_files('vs_search_output.txt')
    	for f in files:
    		insert_lines(f)
    	return None
Build a set of files from a visual studio search result:
Here is the code that will get the set of files in the search result.
Where
PATTERN_OF_FILE is equal to 'C\\:\\\\\w+.txt'. Which means any files with extension .txt whose name is any word character.
def get_files(path):If you run this function you will get a set of files.
'''Return a set of files from a visual studio search output following a regexp pattern
Format of visual studio search output is the following:
Find all "pattern to search", Subfolders, Find Results 1, Entire Solution, "" path_to_file.txt(1): line with text path_to_another_file.txt(22): line1 some text path_to_another_file.txt(29): line2 some text Matching lines: 2 Matching files: 2 Total files searched: 205
Args:
path: A path to a file with the search result
Returns:
A set of all files in search result that match PATTERN_OF_FILE regular expression.
'''
from re import search
from re import escape
f = open(path, 'r')
# paths is a set structure with all the different files to look for.
paths = set()
count = 0
for line in f:
m = search(PATTERN_OF_FILE, line)
if m:
paths.add(m.group(0))
f.close()
return paths
insert_in_filesis the python file where theget_filesis located.vs_search_output.txtis the visual studio search result listed above.
In a python shell:
    >>> import insert_in_files
    >>> insert_in_files.get_files("vs_search_output.txt")
    {'C:\\file1.txt', 'C:\\file2.txt'}
    >>>
Search for pattern in file and insert a line:
As a remainder here are the constants we use:
PATTERN_OF_FILE = 'C\\:\\\\\w+.txt'And here is the code to search in a file and insert a line:
PATTERN_OF_LINE = '\w+' + '\\ \\=\\ foo\\(' + '\w+' # looking for pattern a = foo(b)
FIRST_VAR = '^\w+'
LINE_TO_INSERT = ' = bar(42)\n'
'''Insert a line with 'FIRST_VAR + LINE_TO_INSERT' after each PATTERN_OF_LINEI made a gist with all the files and scripts.
Go through a file looking for PATTERN_OF_LINE
if found, insert a line just after with 'FIRST_VAR + LINE_TO_INSERT'
Args:
path: a path to a file to search and insert lines if a match is found
Returns:
None
'''
from re import escape
from re import search
fin = open(path, 'r')
open('output', 'w').close() # clear file before processing
fout = open('output', 'w')
for line in fin:
fout.write(line)
match = search(PATTERN_OF_LINE, line)
if match:
res = search(FIRST_VAR, line)
if res:
fout.write(res.group(0) + LINE_TO_INSERT)
fin.close()
fout.close()
# save file
ftemp = open('output', 'r')
try:
open(path, 'w').close() # clear file before processing
except:
print('cannot write in file:', path)
ftemp.close()
return None
f = open(path, 'w')
for line in ftemp:
f.write(line)
f.close()
ftemp.close()
return None
Santiaago
May 12, 2014
If you are building a web application using Google App Engine you might be interested in testing it with your smartphone ( note: for this post, we suppose your appengine server and your smartphone are conected to the same network). This is how I manage to do it.
Get your IP:
First thing to do it to get the IP where the server is running (in this case 192.168.1.X):
On a mac use a ifconfig.
> ifconfigOn a windows machine you would do a
...
inet 192.168.1.X netmask 0xffffff00 broadcast 192.168.1.255
...
ipconfig.
Run your app with the host parameter:
Next you run the app with the
-host parameter set to 0.0.0.0.
> goapp serve -host=0.0.0.0Access your web app from your smartphone:
INFO 2014-04-26 10:25:33,296 devappserver2.py:764] Skipping SDK update check.
WARNING 2014-04-26 10:25:33,299 api_server.py:374] Could not initialize images API; you are likely missing the Python "PIL" module.
INFO 2014-04-26 10:25:33,302 api_server.py:171] Starting API server at: http://localhost:53542
INFO 2014-04-26 10:25:33,305 dispatcher.py:182] Starting module "default" running at: http://0.0.0.0:8080
INFO 2014-04-26 10:25:33,307 admin_server.py:117] Starting admin server at: http://localhost:8000
Finally access your web app from your smartphone with your IP like so:
http://192.168.1.X:8080/
Some links that helped me find this:
- App Engine Go SDK web server running in Vagrant guest (with port forwarding) not reachable from host
- The Go Development Server
Santiaago
Apr 29, 2014
As in previews years, I would like to make a review of the year 2013. It is a little late as April 2014 is passing by... but it is never to late right?
MOOCs:
As a fan of MOOCs, I acomplished some online courses. Not as much as last year, but still, I made some pretty interesting courses:
- Learning from Data from Caltech
- Natural Language processing from Coursera
Both github repositories are available here and here. Both of them were done in Python.
Unfinished MOOCs:
I hate to have this section but some times you are just not able to find the time to accomplish everything you set yourself to. I stared two other MOOCs. One on Machine Learning and a c++ course both from Coursera. I did not have enough time to finish them for different reasons. I might re-try them again at some point in time.
Learning Go:
I set this as one of my goals for 2013, and I am really happy about my progression. During the year I did several projets and follow different tutorials in order to learn more about this language.
Here is a list of some Github repos (or sub repos) in Go that I did (some of them are still in progress).
I also blogged about porting of the udacity course cs253 from Python to Go,there are still some units to do :-)
Introduction to Dart:
I started to play around with Dart and participate in several sessions (more than 10 I would say) of #pairwithme proposed by Chris Strom on his ice code editor. This was really fun and I learned a lot, here I blogged about my experience doing this. I had to stop the #pariwithme sessions because of the time difference between France and the US, but I would recommend it to anyone willing to learn some Dart and help Chris on his project.
Learning AngularJS:
Angular was also one of my goals for 2013, I felt that I was missing knowledge in the web frontend, it is the place where I usually get stucked the most. I have learned a lot on angularjs and also on javascript and how to build modern web apps. This pluralsight course helped me with this, though it is not the best pluralsight course and it really goes fast on some aspects you wish they could have taken more time to address. I build a repo for this course that helps me remember how to do certain things, though it is not up to date as it was done on April 2013 and the angular versions go pretty fast. Right now I am building a project with Angularjs on the frontend and Go and Google App Engine on the backend. The project is really nice, and it is planned to go live in 2014. More on that later.
More courses, more learning!
Around July I attended a one week summer school in Tarragona, Spain which addressed different themes in the computer science world, this was really great and I learned a lot from it. My main highlights on this week where the following courses:
- Web Search and Advertising by Professor Prabhakar Raghavan from Google, where we build a search engine in python. I made a prototype in Python and Google App Engine here.
- Deep Learning of Representations by professor Yoshua Bengio, on Deep Learning in general.
Let's see what 2014 brings. :-)
Santiaago
Feb 19, 2014
Recently I had to order an array of structures based on a time.Time field. Doing this was surprisingly easy in Go, so much that it is worth a small post :-)
Imagine you have a structure that contains a Date field, let’s use a simple Post structure as an example:
type Post struct {
    Id       int64
    Date     time.Time
    Title    string
    Content  string
}
There is a chance that you will also have a container for those Posts in your code.posts := []Post{p1, p2, p3, p4}Now, how can you sort this array by dates? If you search for sort array in Go you will get as first result the sort package with some great examples. Sorting by a time.Time type is not different, all you need is to change the sort implementation for Time type.So for this specific example we need to implement
Len, Swap and Less. For the Less function, use the Before function available in the time package.type ByDate []PostFinally, just call the sort function:
func (a ByDate) Len() int { return len(a) }
func (a ByDate) Swap(i, j int) { a[i], a[j] = a[j], a[i] }
func (a ByDate) Less(i, j int) bool { return a[i].Date.Before(a[j].Date) }
sort.Sort(ByDate(posts))I made a Gist sortbydate.go with a simple example, an array of dates, and as you can see this is easily extendable.
Jul 12, 2013
On this post I continue to port Udacity course CS253 Web Development from python to Go. This time I am working on Unit 3. This is a long unit with a lot of ground so let's get started.
You can check out my previous blog post if you haven't done it yet:
The code is at the following locations:
- The python repository.
- The Go repository.
This unit has three parts. The first part concerns the new Post handler which let you create a Post Entity in the Datastore. The second part is about the Permalink handler, this deals with RegexHandlers, memcache and templates. The third part deals with the FrontBlog Handler which displays the most recent posts.
1. NewPostHandler:
The main architecture of the NewPostHandler is the following:
A GET method to display the Form.
A POST method to read the html Form, create the post and do a redirection to the created post.
// NewPostHandler is the HTTP handler to create a new Post
func NewPostHandler(w http.ResponseWriter, r *http.Request){
	c := appengine.NewContext(r)
	if r.Method == "GET" {
		// display the form
	}else if r.Method == "POST"{
		// read the html form
		// create a post entity
		// redirect to the created post
	}
}
1.1 The GET method:
The NewPostHandler displays a simple Form to create a new post. This is how it looks like:
<form method="post">This template goes hand in hand with this type structure to hold the new post information:
<label>
<div>subject</div>
<input type="text" name="subject" value="{{.Subject}}">
</label>
<label>
<div>content</div><textarea name="content">{{.Content}}</textarea>
</label>
<div class="error">{{.Error}}</div>
<br>
<input type="submit">
</form>
// NewPostForm is the type used to hold the new post information.We display the Form by calling writeNewPostForm:
type NewPostForm struct{
Subject string
Content string
Error string
}
// executes the newpost.html template with NewPostForm type as param.
func writeNewPostForm(c appengine.Context, w http.ResponseWriter, postForm *NewPostForm){
	tmpl, err := template.ParseFiles("templates/newpost.html")
	if err != nil{
		c.Errorf(err.Error())
	}
	err = tmpl.Execute(w,postForm)
	if err != nil{
		c.Errorf(err.Error())
	}
}
1.2 The POST method:
As always we read the information from the form by calling r.FormValue(), then as in the previous unit we check the validity of the inputs before doing any further work.
postForm := NewPostForm{
	r.FormValue("subject"),
	r.FormValue("content"),
	"",
}
if !(tools.IsStringValid(postForm.Subject) &&
	tools.IsStringValid(postForm.Content)){

	postForm.Error = "We need to set both a subject and some content"
	writeNewPostForm(w, &postForm)
}else{
	// create a blog post here.
	// ...
}
Once we are sure about the inputs, we can create a blog post. The first step, as for the python version, is to have an entity Post:// Post is the type used to hold the Post information.Note: You will need to import
type Post struct {
Id int64
Subject string
Content string
Created time.Time
}
"appengine/datastore" to perform the following operations.To create an entity Post, I start by creating an ID, a Key and then I persist the Post entity via a Put method.
postID, _, _ := datastore.AllocateIDs(c, "Post", nil, 1)I decided to store the postID into the entity, it is easiear the retreive it later in order to perform a permalink redirect
key := datastore.NewKey(c, "Post", "", postID, nil)
p := models.Post{
postID,
postForm.Subject,
postForm.Content,
time.Now(),
}
key, err := datastore.Put(c, key, &p)
if err != nil {
http.Error(w, err.Error(), http.StatusInternalServerError)
return
}
"/blog/postid". In python this is easier as you can just do the following: p.key().id()In python this is how I created the Post:
def post(self):where blog_key returns a Key for the blog entity:
user_subject = self.request.get('subject')
user_content = self.request.get('content')
subject = valid_str(user_subject)
content = valid_str(user_content)
if not(subject and content):
self.write_form("We need to set both a subject and some content",user_subject,user_content)
else:
p = Post(parent = blog_key(), subject = user_subject,content = user_content)
p.put()
#redirect to permalink
self.redirect("/unit3/blog/%s" % str(p.key().id()))
def blog_key(name = 'default'):Next step now, perform a redirection to the postID permalink:
return db.Key.from_path('blogs', name)
// build url and redirectthe Post entity is in the datastore now. We can now deal with the Permalink handler.
permalinkURL := "/blog/"+strconv.FormatInt(p.Id,10)
http.Redirect(w, r, permalinkURL, http.StatusFound)
2. Permalink
2.1 Regex handlers
The first thing to work on when starting the permalink is how to dispatch the handlers.
In python this is easily done as the WSGIApplication is able to parse regular expressions.
('/unit3/blog/?',BlogFront),
('/unit3/blog/newpost',NewPostHandler),
('/unit3/blog/([0-9]+)', Permalink),
In Go you cannot do this so I had to do some searching and this is the solution I came up with.Note: I used the following sources and made some changes in order to have the same behavior as in python:To use it, I create a RegexpHandler type that has it's own HandleFunc method.
This is how my
init() method looks like after using the RegexpHandler:func init(){
h := new( tools.RegexpHandler)
h.HandleFunc("/",mainHandler)
h.HandleFunc("/blog/?", unit3.BlogFrontHandler)
h.HandleFunc("/blog/newpost", unit3.NewPostHandler)
h.HandleFunc("/blog/[0-9]+/?",unit3.PermalinkHandler)
http.Handle("/",h)
}And this is how the RegexpHandler looks like:package toolsNow that my permalinkHandler is ready we can focus on the permalink handler implementation.
import (
"net/http"
"regexp"
)
type route struct {
pattern *regexp.Regexp
handler http.Handler
}
type RegexpHandler struct {
routes []*route
}
func (h *RegexpHandler) Handler(pattern *regexp.Regexp, handler http.Handler) {
h.routes = append(h.routes, &route{pattern, handler})
}
func (h *RegexpHandler) HandleFunc(strPattern string, handler func(http.ResponseWriter, *http.Request)) {
// encapsulate string pattern with start and end constraints
// so that HandleFunc would work as for Python GAE
pattern := regexp.MustCompile("^"+strPattern+"$")
h.routes = append(h.routes, &route{pattern, http.HandlerFunc(handler)})
}
func (h *RegexpHandler) ServeHTTP(w http.ResponseWriter, r *http.Request) {
for _, route := range h.routes {
if route.pattern.MatchString(r.URL.Path) {
route.handler.ServeHTTP(w, r)
return
}
}
// no pattern matched; send 404 response
http.NotFound(w, r)
}
2.2 Retrieve the Post id
First thing to do is retrieve the id from the url. In python this is really easy as the id is a parameter of your get() method:
class Permalink(renderHandler):In Go I did not find a way to do this so I had to retreive the id from the URL.
def get(self, post_id):
# do something awesome with post_id
func PermalinkHandler(w http.ResponseWriter, r *http.Request){

	if r.Method == "GET" {

		path := strings.Split(r.URL.String(), "/")
		intID, _ := strconv.ParseInt(path[2], 0, 64)
		// do something awesome with the intID
Now that I have the post ID I can perform a query to the datastore and cache it into memcache if it does not yet exist.2.3 Query the datastore and memcache
I created a function called PostAndTimeByID which returns me the following structure:
// PostAndTime is the type used to hold an entity Post and it's "cache hit time" information.I had to work a little bit more on this as you need to encode the information you want to put in the cache. To add the PostAndTime structure to memcache you have to encapsulate first in a memcache Item.
type PostAndTime struct{
Post Post
Cache_hit_time time.Time
}
func Add(c appengine.Context, item *Item) errorAn Item has a Key and its value. The value needs to be a slice of bytes. So to pass the bytes of the PostAndTime structure, I decided to use gob (the other option was to use the json encoder) to encode and decode the bytes of my structure.
2.4 GOB encode and decode
Here is how to encode the structure to bytes with gob and set it to memcache:
// record information in cache for next timeNote: You need to register the type you want to encode before doing the above code, else it will panic. This is done by calling the
mCache := new(bytes.Buffer)
encCache := gob.NewEncoder(mCache)
encCache.Encode(postAndTime)
postItem := &memcache.Item{
Key: memcacheKey,
Value: mCache.Bytes(),
}
if err := memcache.Add(c, postItem); err == memcache.ErrNotStored {
c.Errorf("cs253: postAndTime with key %q already exists", item.Key)
} else if err != nil {
c.Errorf("error adding item: %v", err)
}
Register method. It is important to mention that you cannot register a type more than once or it will panic as well so the best is to have this in the init function of your package as follows:func init(){
gob.Register(PostAndTime{})
}When the item is found in the memcache, you will have to do the opposite and decode the bytes into the structure. This is how I did it://Memcache item found
var postAndTime PostAndTime
pCache := bytes.NewBuffer(item.Value)
decCache := gob.NewDecoder(pCache)
decCache.Decode(&postAndTime)
2.5 Code of PostAndTimeByID
Here is the full code for PostAndTimeByID function:
// PostAndTimeByID returns a PostAndTime for the requested idNote some memcache operations like the Get method:
func PostAndTimeByID(c appengine.Context, id int64)( PostAndTime){
memcacheKey := "posts_and_time"+strconv.FormatInt(id, 10)
var postAndTime PostAndTime
//query cache first with memcache key
if item, err := memcache.Get(c, memcacheKey); err == memcache.ErrCacheMiss {
//item not in the cache : will perform query instead
key := datastore.NewKey(c, "Post", "", id, nil)
if err := datastore.Get(c, key, &postAndTime.Post); err != nil {
c.Errorf("cs253: post not found : %v", err)
}
// get current hit time
postAndTime.Cache_hit_time = time.Now()
// record information in cache for next time
mCache := new(bytes.Buffer)
encCache := gob.NewEncoder(mCache)
encCache.Encode(postAndTime)

postItem := &memcache.Item{
	Key:   memcacheKey,
	Value: mCache.Bytes(),
}
if err := memcache.Add(c, postItem); err == memcache.ErrNotStored {
	c.Errorf("cs253: postAndTime with key %q already exists", item.Key)
} else if err != nil {
	c.Errorf("error adding item: %v", err)
}
} else if err != nil {
c.Errorf("cs253: Memcache error getting item: %v",err)
} else {
//Memcache item found
pCache := bytes.NewBuffer(item.Value)
decCache := gob.NewDecoder(pCache)
decCache.Decode(&postAndTime)
}
return postAndTime
}
memcache.Get(c, memcacheKey)and Add method:
memcache.Add(c, postItem)Also notice the datastore operation:
datastore.Get(c, key, &postAndTime.Post)
2.6 Using multiple templates
Once you have the post and the memcache hit time you can render the permalink page. This time we are defining the template as a separate file and we are using two templates to do this, a permalink.html template for the structure of the page and a post.html template of the post information (the post.html will be used later on in another handler).
This is how the permalink.html template looks like:
{{define "permalink"}}
<!DOCTYPE html>
<html>
<head>
  <link type="text/css" rel="stylesheet" href="/static/main.css" />
  <title>CS 253 Blog in Go!</title>
</head>
<body>
  <a href="/blog" class="main-title">
    Blog
  </a>
  {{template "post" .Post}}
  <div class="age">
      queried {{.Cache_hit_time}} seconds
    </div>
</body>
</html>
{{end}}
and the post.html template looks like this:{{define "post"}}
<div class="post">
<div class="post-heading">
<div class="post-title">
<a href="/blog/{{.Id}}" class="post-link">{{.Subject}}</a>
</div>
<div class="post-date">
{{.Created.Format "02-01-2006 15:04:05"}}
</div>
</div>
<div class="post-content">
{{.Content}}
</div>
</div>
{{end}}
Notice that I pass .Post to the post template like this:
{{template "post" .Post}}To render these two templates together we have to parse them first and then execute the permalink template.
// writePermalink executes the permalink.html template with a PostAndTime type as param.This is all concerning the permalink handler, next is the blog front handler where we display the first 10 blog posts.
func writePermalink(c appengine.Context, w http.ResponseWriter, p models.PostAndTime){
tmpl, err := template.ParseFiles("templates/permalink.html","templates/post.html")
if err != nil{
c.Errorf(err.Error())
}
err = tmpl.ExecuteTemplate(w,"permalink",p)
if err !=nil{
c.Errorf(err.Error())
}
}
3. BlogFrontHandler
The BlogFrontHandler is a simple one. It performs a query for the recent posts and renders them. This is how it looks:
// BlogFrontHandler is the HTTP handler for displaying the most recent posts.The RecentPosts function performs a query in the datastore as follows:
func BlogFrontHandler(w http.ResponseWriter, r *http.Request){
c := appengine.NewContext(r)
if r.Method == "GET" {
posts := models.RecentPosts(c)
writeBlog(w, posts)
}
}
// RecentPosts returns a pointer to a slice of Posts.The writeBlog function uses two templates, the post.html template and the blog.html template.
// orderBy creation time, limit = 20
func RecentPosts(c appengine.Context)([]*Post){
q := datastore.NewQuery("Post").Limit(20).Order("-Created")
var posts []*Post
if _, err := q.GetAll(c, &posts); err != nil {
c.Errorf("cs253: Error: %v",err)
return nil
}
return posts
}
{{define "blog"}}
    <!-- some html content -->
    <div id="content">
      {{range $i, $p :=.}}
      {{template "post" $p}}
      {{end}}
        <div class="age">
            queried cache_last_hit seconds ago
          </div>
    </div>
    <!-- some closing tags -->
{{end}}
writeBlog looks exactly as writePost (I should factorize this at some point...)// writeBlog executes the blog template with a slice of Posts.This covers the third CS253 unit. Next time will be about Unit 4.
func writeBlog(c appengine.Context, w http.ResponseWriter, posts []*models.Post){
tmpl, err := template.ParseFiles("templates/blog.html","templates/post.html")
if err != nil{
c.Errorf(err.Error())
}
err = tmpl.ExecuteTemplate(w,"blog",posts)
if err != nil{
c.Errorf(err.Error())
}
}
Jun 25, 2013
On this post I continue to port Udacity course CS253 Web Development from python to Go. This time I am working on Unit 2. This is a small and simple unit, just to get warmed up for the next one.
You can check out my previous blog post if you haven't done it yet:
- The python repository.
- The Go repository.
Note: Feel free to comment and share your thoughts, I will be more than happy to update and improve my code and learn to better develop in Go.
This unit has two parts. The first part is the Rot13 Handler which substitutes a string back and forth using the ROT13 cipher. The second part is a signup and welcome workflow.
Unit2: implementing Rot13
Some of you might already be familiar with Rot13, it is a substitution cipher. The Go Tour #60 presents it as well.
In python the ROT13 cipher is built-in the library. This is how it looks in a Python shell:
>>> s = 'hello'As you see you just use the built-in encode() method with the string rot13 and that's it.
>>> s.encode('rot13')
'uryyb'
In Go I did not find anything like this and as I already did the Go Tour exercises I decided to reuse that.
I made some minor changes to the implementation so that the cipher method would return directly a string. This is what it looks like.
// Rot13 is the type used to hold the string to encode.Now that the type structure is ready we can focus on the Handler.
type Rot13 string
// rot13 returns the rot13 substitution of single byte.
func rot13(b byte) byte{
var first, second byte
switch{
case 'a' <= b && b <= 'z':
first, second = 'a', 'z'
case 'A' <= b && b <= 'Z':
first, second = 'A', 'Z'
default:
return b
}
return (b - first + 13)%(second - first + 1) + first
}
// Rot13 implement Encode function to perform ROT13 substitution.
func (r Rot13) Encode() string{
n := len(r)
t:= []byte(r)
for i := 0; i < n; i++{
t[i] = rot13(t[i])
}
return string(t)
}
Unit 2: Rot13 Handler
This is what my Rot13Handler looks like in python:
class Rot13Handler(webapp2.RequestHandler):And this is how it looks in Go:
def write_form(self,rot13=""):
self.response.out.write(htmlRot13%{"rot13":escape_html(rot13)})
def get(self):
self.write_form()
def post(self):
user_input = self.request.get('text')
input_changed = user_input.encode('rot13')
self.write_form(input_changed)
// Rot13Handler is the HTTP handler for encoding and decoding a string.
// (rot13(rot13(x)) = x )
func Rot13Handler(w http.ResponseWriter, r *http.Request){
	c := appengine.NewContext(r)
	if r.Method == "GET" {
		writeFormRot13(w, "")
	} else if r.Method == "POST"{
		var r13 Rot13 = Rot13(r.FormValue("text"))
		writeFormRot13(w, r13.Encode())
	}else{
		tools.Error404(w)
		return
	}
}
As in unit1 I define an internal const string and a template to work on this unit.
var rot13Template = template.Must(template.New("Rot13").Parse(rot13HTML)) And this is what the const <!DOCTYPE html><html>Since this is a fairly simple example we can do this internally. For next units I am going to externalize the html into separate templates.
<head><title>Unit 2 Rot 13</title></head>
<body>
<h2>Enter some text to ROT13:</h2>
<form method="post">
<textarea name="text" style="height: 100px; width: 400px;">{{.Str}}</textarea><br>
<input type="submit">
</form>
</body>
</html>
The Rot13Handler checks the
POST and GET method. On the GET method it will simply display the blank form. On the POST method we will get the form information as usual by doingr.FormValue("text") and then encode this by doing the ROT13 substitution r13.Encode().
Unit 2: Signup handler
The signup url has a simple signup form. When the form is submitted we verify its content and redirect on success and display the errors otherwise.
<!DOCTYPE html><html>The
<head>
<title>Sign Up</title>
<style type="text/css">.label {text-align: right}.error {color: red}</style>
</head>
<body>
<h2>Signup</h2>
<form method="post">
<table>
<tr>
<td class="label">Username</td>
<td><input type="text" name="username" value="{{.Username}}"></td>
<td class="error">{{.ErrorUser}}</td>
</tr>
<tr>
<td class="label">Password</td>
<td><input type="password" name="password" value="{{.Password}}"></td>
<td class="error">{{.ErrorPassword}}</td>
</tr>
<tr>
<td class="label">Verify Password</td>
<td><input type="password" name="verify" value="{{.Verify}}"></td>
<td class="error">{{.ErrorPasswordMatch}}</td>
</tr>
<tr>
<td class="label">Email (optional)</td>
<td><input type="text" name="email" value="{{.Email}}"></td>
<td class="error">{{.ErrorEmail}}</td>
</tr>
</table>
<input type="submit">
</form>
</body>
</html>
GET method is a simple execution of the signup template with no information in it. For the POST method I decided to create a Signup type to hold the user's information and the possible errors it might have.type Signup struct{
Username string
Password string
Email string
Verify string
ErrorUser string
ErrorPassword string
ErrorPasswordMatch string
ErrorEmail string
}We retrieve the signup information as before done, by calling r.FormValue then we proceed to check the validity of the Form. Here is what the SignupHandler looks like:func SignupHandler(w http.ResponseWriter, r *http.Request){
c := appengine.NewContext(r)
if r.Method == "GET" {
s := Signup{}
writeFormSignup(w, s)
} else if r.Method == "POST"{
s := Signup{
Username: r.FormValue("username"),
Password: r.FormValue("password"),
Email: r.FormValue("email"),
Verify: r.FormValue("verify"),
ErrorUser: "",
ErrorPassword: "",
ErrorPasswordMatch: "",
ErrorEmail: "",
}
// verify signup info.
if !(tools.IsUsernameValid(s.Username) &&
tools.IsPasswordValid(s.Password) &&
s.Password == s.Verify) ||
(len(s.Email) > 0 && !tools.IsEmailValid(s.Email)){
if ! tools.IsUsernameValid(s.Username){
s.ErrorUser = "That's not a valid user name."
}
// more code for each input.
// ...
s.Password = ""
s.Verify = ""
writeFormSignup(w s)
}
}else{
http.Redirect(w,r, "/unit2/welcome?username="+s.Username, http.StatusFound)
}
}
}
I put all the validation of inputs in a small valid.go file with some helper functions. Right now I am adding this to a Tools packages next to other helper functions. Though I might move it somewhere else later on.The functions in valid.go are the following:
func IsUsernameValid(username string) boolThey work with the regexp package and check the validity in different ways. There is not much difference between the two implementations:
func IsPasswordValid(password string) bool
func IsEmailValid(email string) bool
func IsStringValid(s string) bool
In Python:
EMAIL_RE = re.compile(r"^[\S]+@[\S]+\.[\S]+$")Here is the Go version:
def valid_email(email):
return EMAIL_RE.match(email)
var EMAIL_RE = regexp.MustCompile(`^[\S]+@[\S]+\.[\S]+$`)In case of a wrong input, we update the signup data with the corresponding errors and execute again the signupTemplate.
func IsEmailValid(email string) bool{
return EMAIL_RE.MatchString(email)
}
In case of a correct input we will redirect to the
/unit2/welcome page this time with a parameter username as follows:http.Redirect(w,r, "/unit2/welcome?username="+s.Username, http.StatusFound)
Unit 2: Welcome Handler
Once we redirect to the welcome handler we need to retrieve the information from the URL and display in. Here is the HTML of the welcome handler:
<!DOCTYPE html><html>
<head>
<title>Unit 2 Signup</title>
</head>
<body>
<h2>Welcome, {{.}}!</h2>
</body>
</html>
In python we would get the user name value with a request.get method:
class WelcomeHandler(webapp2.RequestHandler):In Go we do this by getting the information from the Form value method on the HTTP request:
def get(self):
username= self.request.get('username')
self.response.out.write(htmlWelcome%{'username':username})
func WelcomeHandler(w http.ResponseWriter, r *http.Request){
	c := appengine.NewContext(r)
	if r.Method == "GET" {
		username := r.FormValue("username")
		if err := welcomeTemplate.Execute(w,username); err != nil{
			http.Error(w, err.Error(), http.StatusInternalServerError)
			return
		}
	}else{
		tools.Error404(w)
		return
	}
}
Organizing packages:
In the python version, I had a unitx.py for each unit I had. In Go I have changed this by putting a Package for each unit. So right now I have 2 directories. unit1 and unit2. What is interesting in Go is that I can have multiple .go files and still have all of them correspond to the same package.
For example, in the unit2 package I have 3 files:
- rot13.go
- signup.go
- welcome.go
This is also very nice when you are doing small helper functions. I did a tools package and I have some files in it, like valid.go which is used in this unit. And server.go which handles 404 errors. It feels really nice to decouple each helper function into separate files and still have them all belong to the same package.
This covers the second CS253 Unit. Next time will be about Unit 3.
SantiaagoJun 12, 2013
I am starting to port Udacity course CS253 Web Development from python to Go. This seems to be a good way to get into Go while covering App Engine SDK.
- The python repository.
- The Go repository.
Note:If you have any comments please do so, I will be more than happy to update and improve my code and learn to better develop in Go code.
Starting with Go and App Engine
To start with Go and App Engine there are a lot of resources out there. Here are the ones I used the most:
- The Go Tour.
- PluralSight course on Go.
- Writing Web Applications
- Udacity CS253 course (python and Google App Engine).
- The Getting Started tutorial of GAE in Go
Installation and commands
Go App Engine SDK does not have a GoogleAppEngineLauncher (like for python). So you will have to launch and deploy your application via the command line.
To run my application I do as follows:
~/google_appengine/dev_appserver.py udacity.cs253.go/I put the google_appengine sdk in
~. I had some troubles when I put the Go GAE scripts in my PATH as I also have the python GAE SDK, I think it conflicts. This is the reason why I am explicit when running dev_appserver.py.To deploy my application I do as follows:
~/google_appengine/appcfg.py update udacity.cs253.goNote: udacity.cs253.go is the name of my application.
Unit 1: Hello World and Handlers
So I started with Unit 1. Here is what the python code of my main.py looks like in python, 3 handlers a simple hello world handler and 2 handlers date and thanks that comunicate through a Form:
import webapp2And here is what my main.go looks like after some work.
import re
from unit1 import *
class MainHandler(webapp2.RequestHandler):
def get(self):
self.response.out.write('Hello Udacity!')
app = webapp2.WSGIApplication([('/', MainHandler),
('/unit1/date',DateHandler),
('/unit1/thanks',ThanksHandler)],debug=True)
package mainI am using the context interface to log in the console.
import (
"fmt"
"net/http"
"appengine"
"unit1"
)
func init(){
http.HandleFunc("/", mainHandler)
http.HandleFunc("/unit1/date", unit1.DateHandler)
http.HandleFunc("/unit1/thanks", unit1.ThanksHandler)
}
func mainHandler(w http.ResponseWriter, r *http.Request){
c := appengine.NewContext(r)
c.Infof("Requested URL: %v", r.URL)
fmt.Fprint(w,"hello Udacity with Go!")
}
c.Infof("Requested URL: %v", r.URL)This will display on your console as follows:2013/06/09 19:38:14 INFO: Requested URL: /Also, I decided to do a package for every unit so that I can simply import each package like this:
import (
	"fmt"
	"net/http"
	"appengine"
	"unit1"
	"unit2"
        "unit3"
)
I won't be externalizing this so there is no need to do the github/santiaago/.. organization for packages.
Unit 1: Date and Thanks Handlers
The /unit1/date url has a simple form with month, day and year inputs and a submit button.
In Jinja this is the template that was used for the course:
<form method="post">Go handles templates in the html package, so there is no need to install jinja or any template API, that is a great plus. Here is my resulting template for this part of the course.
What is your birthday?
<br>
<label>Month
<input name="month" value="%(month)s">
</label>
<label>Day
<input name="day" value="%(day)s">
</label>
<label>Year
<input name="year" value="%(year)s">
</label>
<div style="color:red">%(error)s</div>
<br>
<br>
<input type="submit">
</form>
<html>Some notes about this:
<body>
<form method="post">
What is your birthday?
<br>
<label>Month
<input name="month" value="{{.Month}}">
</label>
<label>Day
<input name="day" value="{{.Day}}">
</label>
<label>Year
<input name="year" value="{{.Year}}">
</label>
<div style="color:red">{{.Error}}</div>
<br>
<br>
<input type="submit">
</form>
</body>
</html>
- Templates in Go work with curly braces.
- Notice that I had to add the html, and body tags to this template else it would display an error as the html is not a valid web page.
type Date struct{
	Month string
	Day string
	Year string
	Error string
}
To render the form I now do the following:func DateHandler(w http.ResponseWriter, r *http.Request){
if r.Method == "GET" {
date := Date{
Month: "",
Day: "",
Year: "",
}
if err := dateTemplate.Execute(w,date); err != nil{
http.Error(w, err.Error(), http.StatusInternalServerError)
return
}
} else if r.Method == "POST"{
// ...
}
}
where dateHTML is the html template defined above and dateTemplate is defined as follows and uses the template package:var dateTemplate = template.Must(template.New("MyDate").Parse(dateHTML))
Post and Get methods
To handle Post and Get methods in python you would have a class for each handler and a Post and Get method as follows:
class DateHandler(webapp2.RequestHandler):
    def get(self):
        # to something

    def post(self):
        # do something else
In Go you don't have classes and each handler is a function itself. Right now I am testing the http.Request Method to differentiate each case:
func DateHandler(w http.ResponseWriter, r *http.Request){
	c := appengine.NewContext(r)
	c.Infof("cs253: Requested URL: %v", r.URL)
	c.Infof("cs253: Http METHOD: %v",r.Method)
	if r.Method == "GET" {
                // do something
	} else if r.Method == "POST"{
                // do something else
	}else{
                // this is an error
	}
}
Extracting information from the Form
On the post method we will extract the form information, this is a very common case.
In python you would get the information as follows:
def post(self):
   user_month = self.request.get('month')
   user_day = self.request.get('day')
   user_year = self.request.get('year')

   month = valid_month(user_month)
   day = valid_day(user_day)
   year = valid_year(user_year)
   if not(month and day and year):
       self.write_form("That's an error!",user_month,user_day,user_year)
   else:
       self.redirect('/unit1/thanks')
In Go this is how I handled this:
func DateHandler(w http.ResponseWriter, r *http.Request){
	c := appengine.NewContext(r)
	c.Infof("cs253: Requested URL: %v", r.URL)
	c.Infof("cs253: Http METHOD: %v",r.Method)
	if r.Method == "GET" {
                // the GET method
	} else if r.Method == "POST"{
		d := Date{
			Month: validMonth(r.FormValue("month")),
			Day: validDay(r.FormValue("day")),
			Year: validYear(r.FormValue("year")),
					}
		if d.Day == "" || d.Month == "" || d.Year == ""{
			d.Error = "That's an error!"
			if err := dateTemplate.Execute(w,d); err != nil{
				http.Error(w, err.Error(), http.StatusInternalServerError)
				return
			}
		}
		http.Redirect(w,r, "/unit1/thanks", http.StatusFound)
	}
}
To get the values I use the FormValue method on the http.Request. Then just execute the template with the structure.
This covers the first CS253 Unit. Next time will be about Unit 2.
Santiaago
May 20, 2013
On May 2nd Chris Strom wrote a message on G+. He was looking for some candidates to try out the new Google Hangouts Remote Desktop while working on Dart.
I decided to give it a try, though I had never done any Dart development prior to this meeting.
This quote gave me enough confidence to send him an email and try this out. Since then I have done more than 5 #pairwithme sessions with him while switching between his machine and mine.Zero Dart experience required. Really :)
Chris Strom
I want to use this post to review some of the things I have learned through these sessions. I believe more #pairwithme sessions should exist in any community.
By doing pair reviews and working on each other's machines, you get to see how others would tackle certain problems, how they would read errors or debug stuff. This allows you to get smoothly into the language while avoiding silly mistakes. Also, you get to learn from each other's methods and that is always a plus.
Getting started:
To my surprise the only thing I needed to get started was the Dart Editor and a fork of the ice-code-editor (the JavaScript version is live here ).
The out of the box experience with Dart is excellent. You are up and running in a short period of time and the Dart tutorials are a great material to get you started.
About Google Hangout remote desktop:
The quality of the remote desktop is great. The latency between screen updates has been very low so the pairing experience has been very pleasant even though I am currenlty in France and Chris is in the U.S.
We did encounter some issues when using each others keyboards. I have an azerty keyboard while Chris has a qwerty one.
Emacs and Dart:
There is a dart-mode for emacs. You can do a M-x package-list-packages, search for dart-mode, once you have found the package press I to mark for installation, then press X to start the package installation.
Dart paths and commands (OSX):
Chromium: is available underdart/Chromium/Chromium.app. Is good to have Chromium running while you are working on your app.DartEditor: is available underdart/DartEditor.app. The editor is really easy to work with and is well presented in the Dart Tutorials.- To run an application you can do
dart yourapp.dartfrom a command line. Thedartcommand is available underdart/dart-sdk/binyou might want to add that to your path. - The
dartanalyzerdoes the same work that the DartEditor does when it highlights errors and warning. It is also available underdart/dart-sdk/binand is great if you want to use other editors like vim or emacs.
On Dart:
Through this pair review sessions we have worked on multiple issues while porting to Dart the ice-code-editor. This is great because you get to see multiple aspects of the language (Unit tests, JS interop, DOM usage). Here are some of the things we went through during these sessions.
DOM manipulation:
We worked on hidding some JS dependencies from the ice-code-editor. It turns out that html manipulation is really smooth.
Take a look:
var script = new ScriptElement();Javascript interoperability:
script.src = "packages/ice_code_editor/ace/ace.js";
document.head.nodes.add(script);
There are some examples of how to call Dart from JavaScript and how to handle callbacks here and here. We came up with a similar solution.
Keyboard events:
We also worked on some Keyboard events in order to delay preview updates in the ice-code-editor.
Unit tests:
We have also tackled some unit tests in Dart. You know it is always good to have them :-),
Misc:
Through these sessions I also learned a lot of things that I didn't expect.
Network emulation in linux:
You can emulate network latency netem as described here.
Emacs commands and lisp expressions for my .emacs:
With the following code on your .emacs you can simply select a region and do a C-x C-; to comment out a region of code.
;;comment regionIf you want to insert the content of a file into another file, you can perform a
(global-set-key [?\C-x?\C-\;] 'comment-or-uncomment-region)
C-x i and choose the file you want to insert. Then press Enter.That's about it. Not bad after just a few sessions of Dart in my opinion. I hope someone finds it helpful, and maybe some of you might want to try out or suggest more pair review sessions through the G+ hangouts.
Finally huge thanks to Chris Strom for proposing these #pairwithme sessions they have been really helpful.Santiaago
Jan 07, 2013
2012 was a good year, during which I learned a lot of things. What is interesting is that it was mainly driven by two points: My desire to learn and the availability of online courses.
I completed 7 online courses during 2012. Here are some of the concepts I improved while doing this.
Python:
I used online courses as a way to really learn and improve my python knowledge and I can say that I am pleased with where I am right now (I know there is room for improvement, 2013 here I come). I have learned a lot by doing this. All Udacity courses helped me a lot to get into this language as they use it for all their courses. So, if you are new to python, Udacity courses are definitely a good place to start.
Artificial Intelligence
I have done 3 courses in Artificial Intelligence, 2 from Udacity and one from Edx. I was familiar with some of the things taugth in the courses as I learned them while obtaining my Master's degree. It was fun to relearn them and learn more concepts from this field at the same time.
My birthday present from 2011 was the AI book Artificial Intelligence: A Modern Approach. It was really helpfull to go through these courses with the book by my side, as Udacity and Edx use it as a support for their courses. Definitely a good complement.
I found that these 3 AI courses complement with each other if what you wish is to learn and master some main concepts from this field.
Web technologies
I learned to use Google App Engine platform and API through CS253: Web Development and I am using it right now to host this site. Steve Huffman is really a good teacher and in a small period of time you will have all the tools you need to build something on your own as so many students have done.
The SaaS course put my hands on a lot of different technologies that I would not have had time to discover on my own as fast as I did without the incentive of the course. This course was really fun and it took a lot of time and energy to achieve it, more than I expected, but the experience is definitely worthwhile.
I learned to use the Heroku platform, Amazon Web Services with EC2, as well as Ruby and other tools for testing web applications.
Online Courses can really be a good channel for you to learn or master concepts, the only thing you need is some discipline and being ready to have fun.
Santiaago